Setting up an Application Load Balancer (ALB) with Two Target Groups, EC2 Instances, and Route 53 for a Custom Domain


Table of contents
- Prerequisites:
- Registering a Domain with Namecheap
- Configuring AWS Route 53 Hosted Zones
- Update Name Servers
- Create an ACM Certificate
- Launch an Amazon EC2 Instances:
- Create Target Groups
- Create an Application Load Balancer (ALB)
- Update Listener Rules
- Add Load Balancer Record In Route53
- Access Your Application
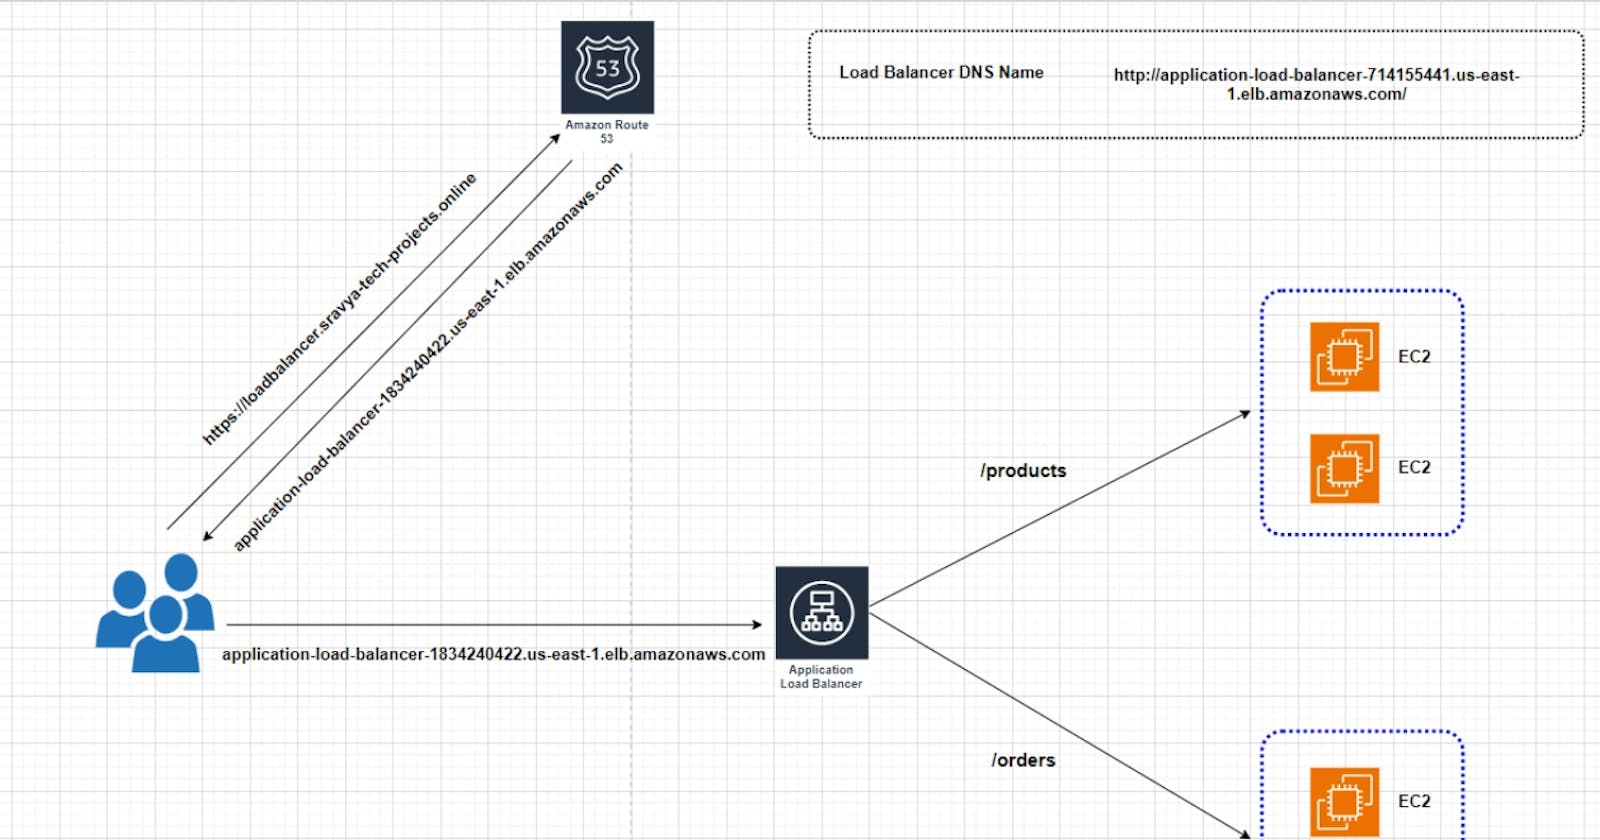
In this blog post, we'll walk you through the process of setting up an Amazon Web Services (AWS) Application Load Balancer (ALB) with two target groups, products-target-group and orders-target-group. We'll also create four EC2 instances, distribute the traffic between the product and order instances using the ALB, and configure Route 53 for a custom domain registered with Namecheap.
Prerequisites:
An AWS account with access to EC2, Load Balancer, Target Group, Route53 and Certificate Manager.
Basic knowledge of AWS services and EC2 instances, Application Load Balancer, Target Group, Security Group and Route53 and Certificate Manager.
Registering a Domain with Namecheap
If you haven't already registered a custom domain, you can do so through domain registrars like Namecheap or Godaddy. Choose a domain name that aligns with the purpose of your application.
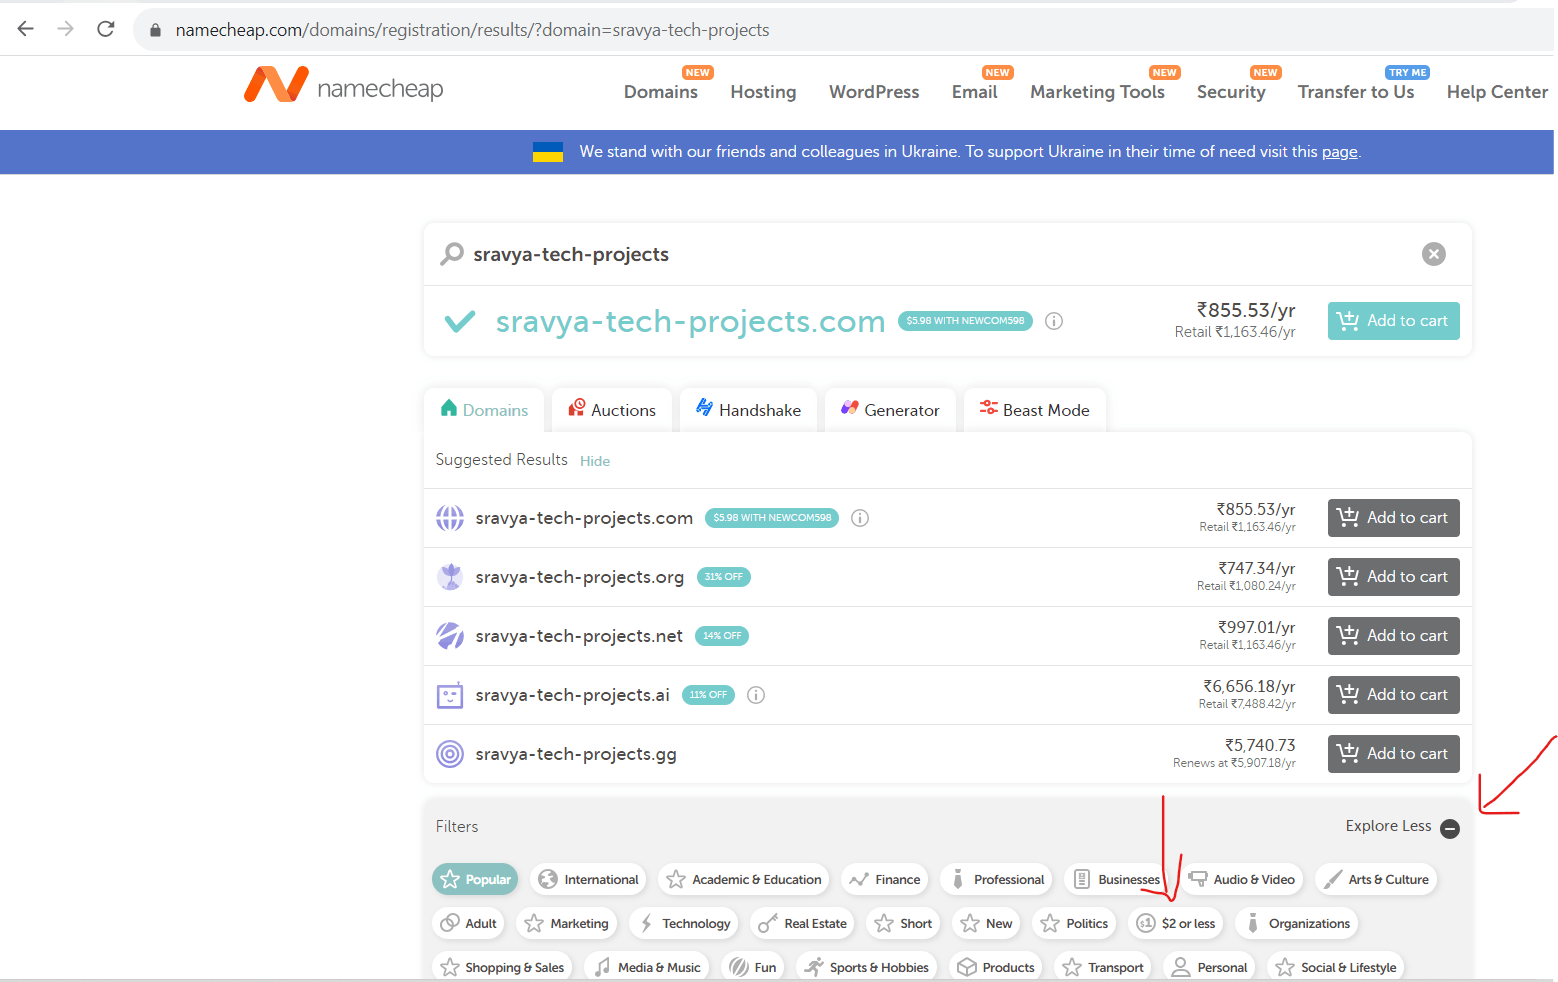
- Go to the NameCheap Website and search for a domain
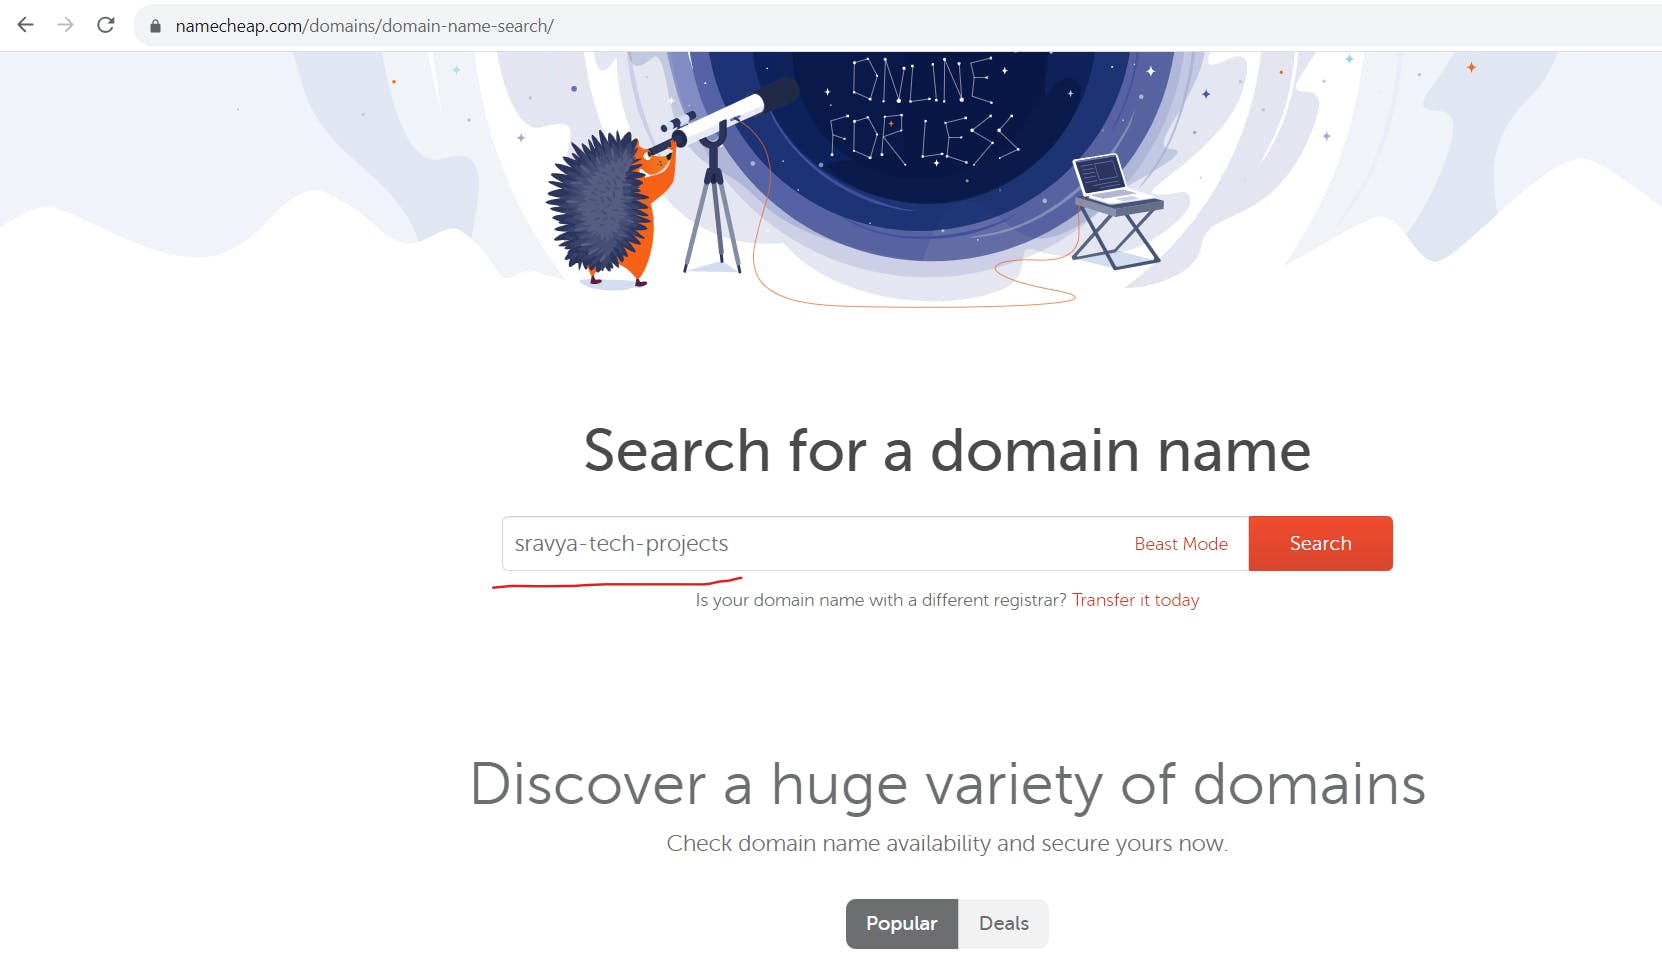
- Choose a domain name that aligns with the purpose of your application.
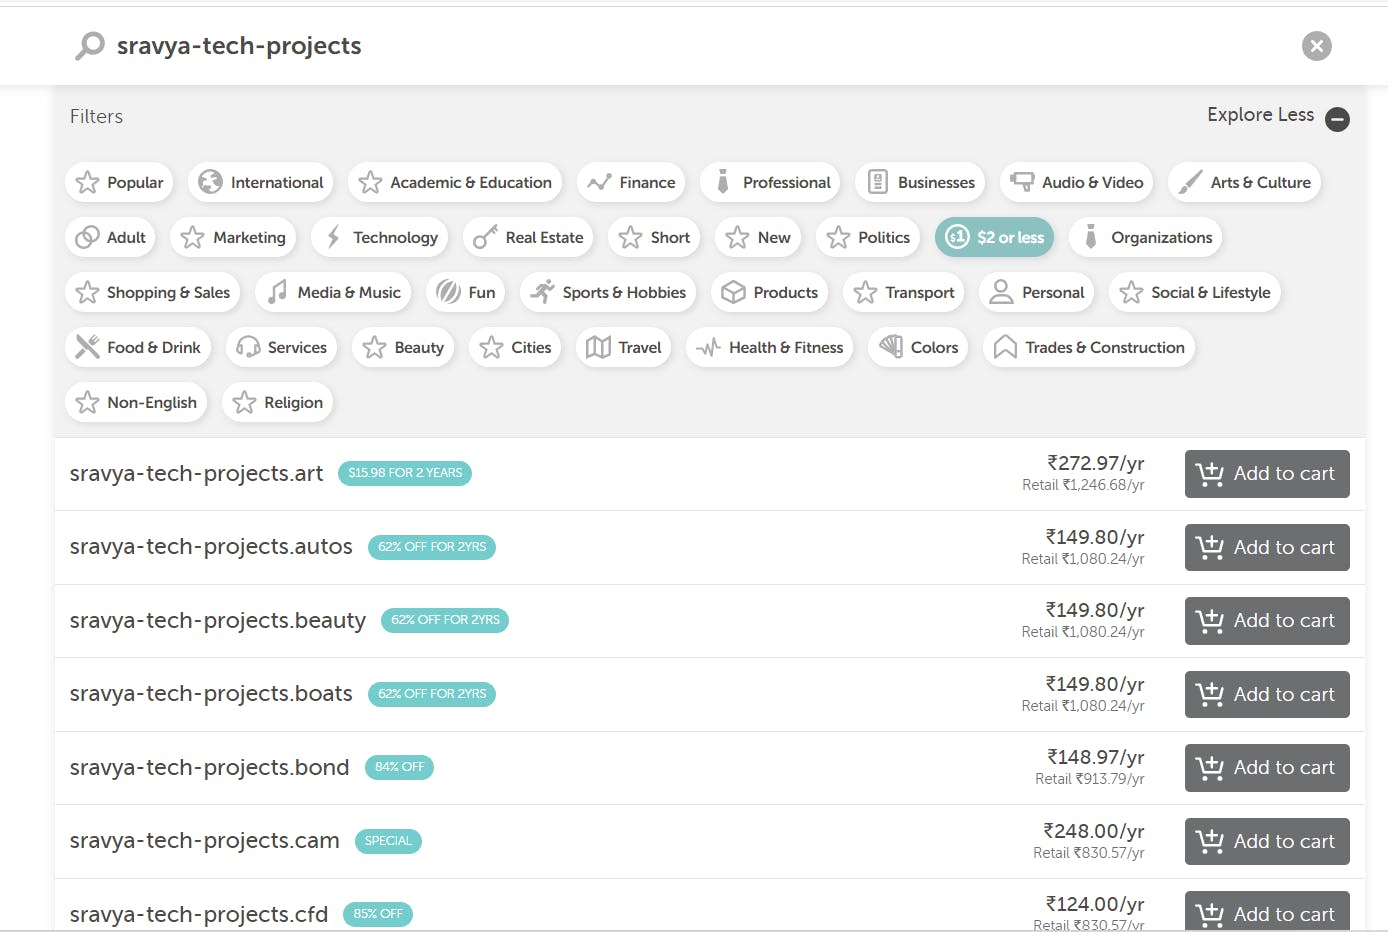
Note: If you want a domain for your practice click on Explore and select $2 or less then you can find the domain below $2
- Click on Add to Cart and Checkout to buy your domain based on the purpose of your application

Configuring AWS Route 53 Hosted Zones
- Navigate to the AWS Route 53 console and click on Create hosted zone

- Give the domain name created in the Namecheap website and click on Create Hosted zone
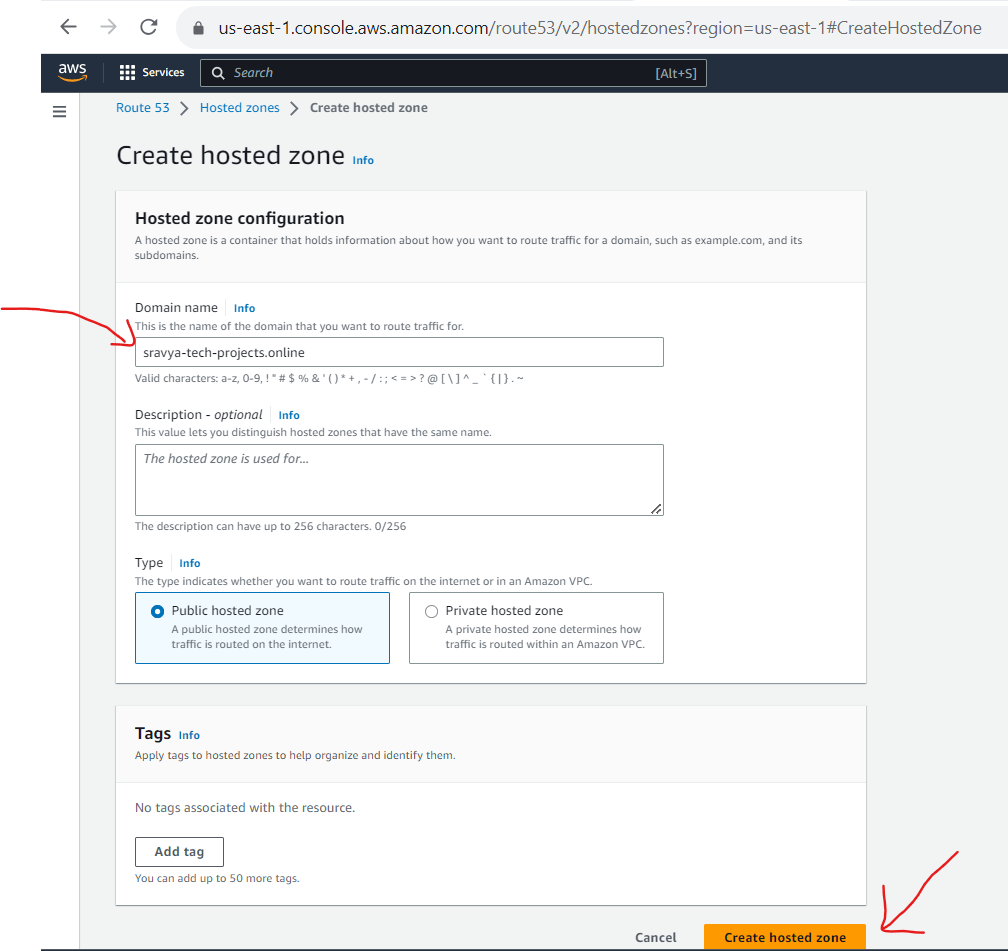
- Created a hosted zone with the Name Servers(NS) and Start of Authority(SOA) records

Update Name Servers
In the Namecheap dashboard (or your domain registrar's control panel), update the DNS name servers to match the ones provided by your AWS Route 53 hosted zone.
Note: This step links your custom domain to your AWS resources.
- Go to Name Cheap Website, Go to Domain Lists and click on Manage to update the name servers

- Go to Domain Section and Select Custom DNS under the NameServers Section

- Update the NameServers which we have under the Route53 hosted zone section

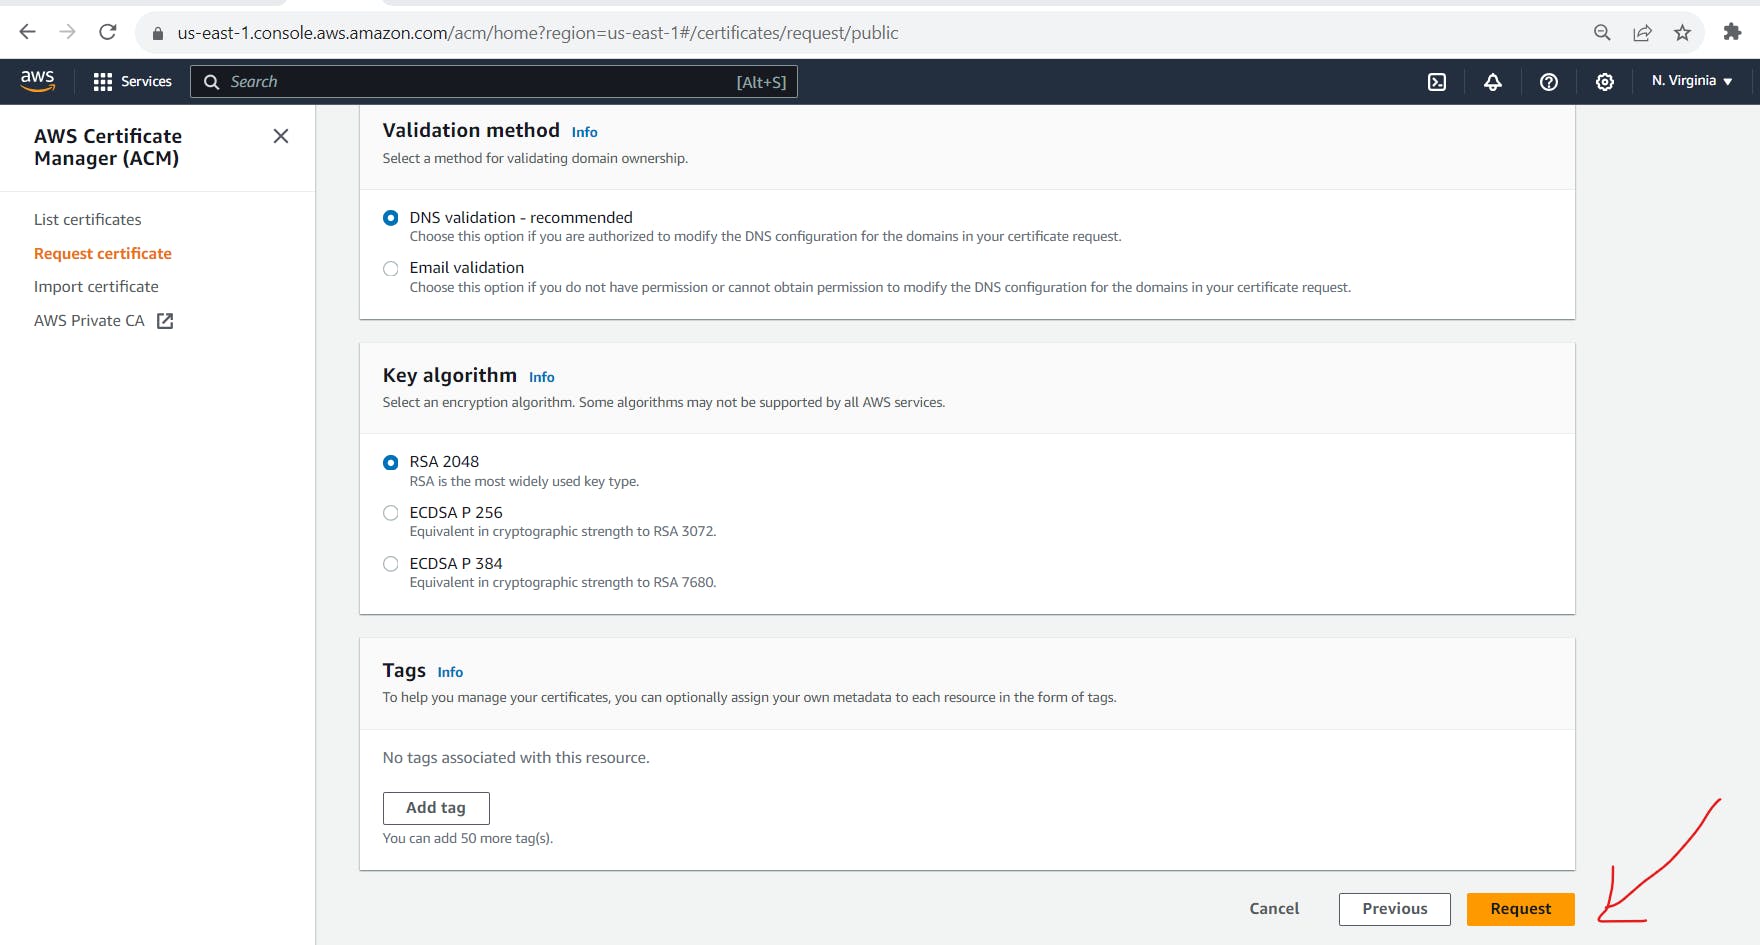
Create an ACM Certificate
In the AWS Management Console, navigate to the ACM (Amazon Certificate Manager) service.
Click "Request a certificate."

- Choose "Request a public certificate."

Enter your domain name (e.g., sravya-tech-projects.online) and any additional domain names (e.g., cloudfront.sravya-tech-projects.online) you wish to secure with the certificate. Click "Next."
Choose a validation method (DNS validation is recommended) and complete the necessary steps for domain validation.

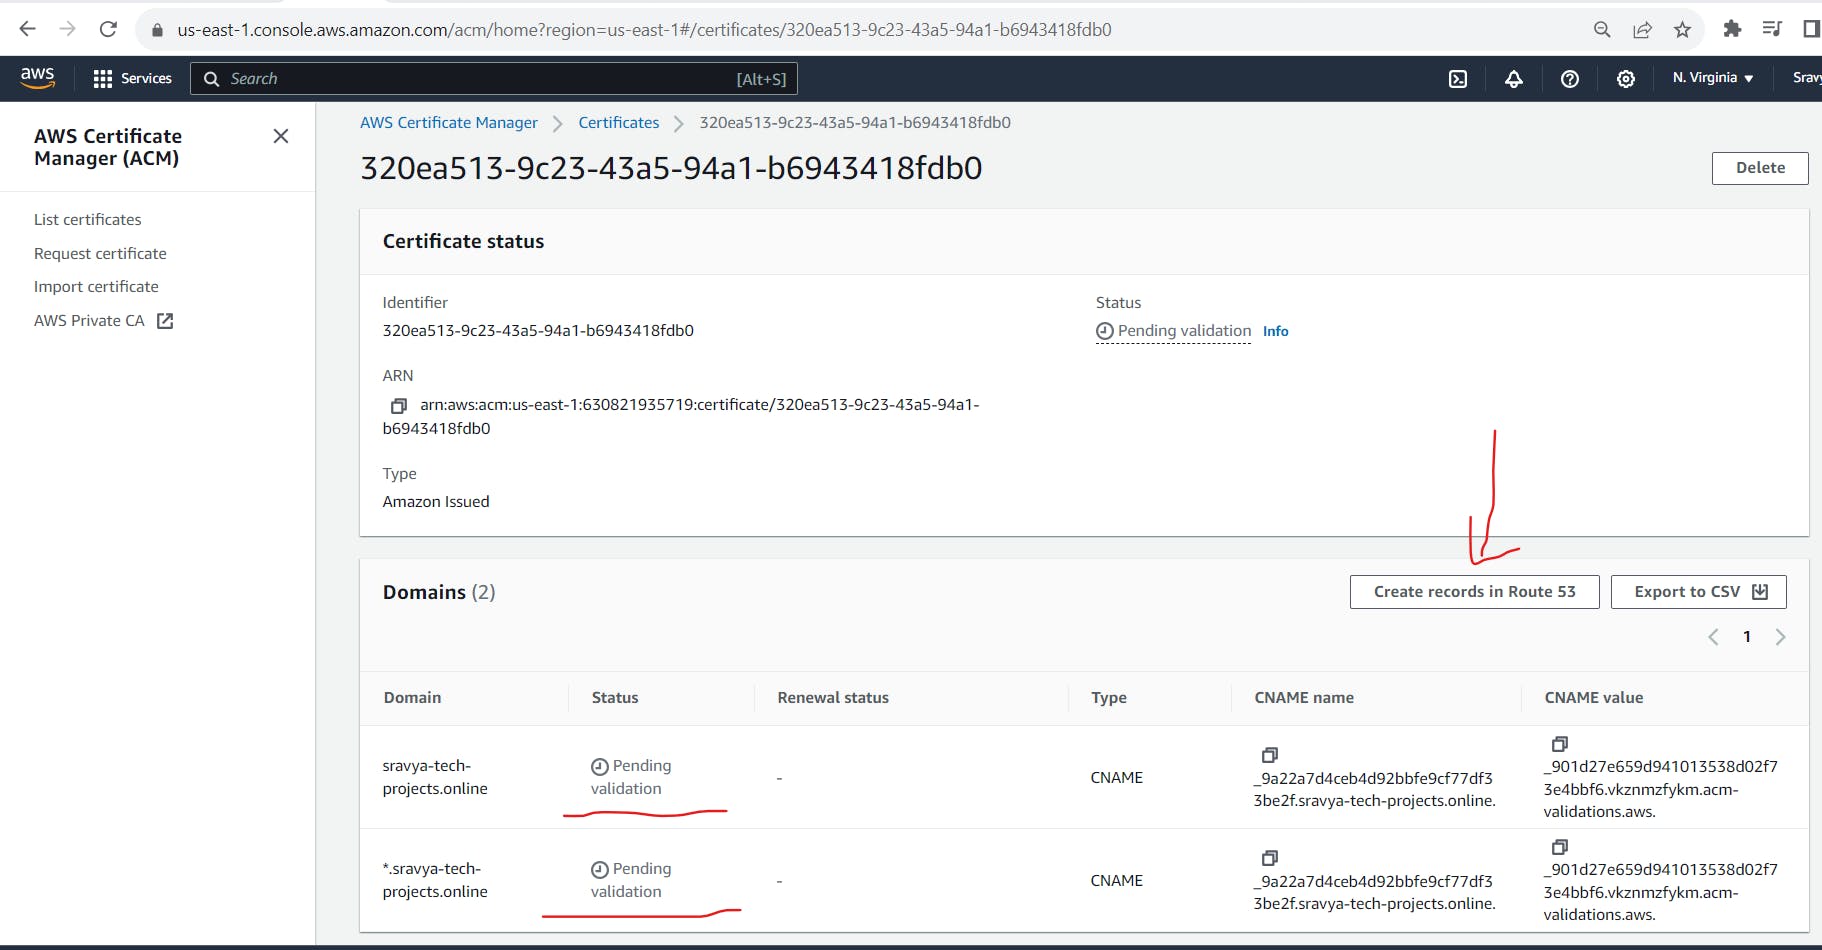
- Request for certificate
- Click on Create records in route 53 then automatically these CNAME name and CNAME values for this certificate record will update in the route53 hosted zone
- Once validation is successful, your certificate will be issued.
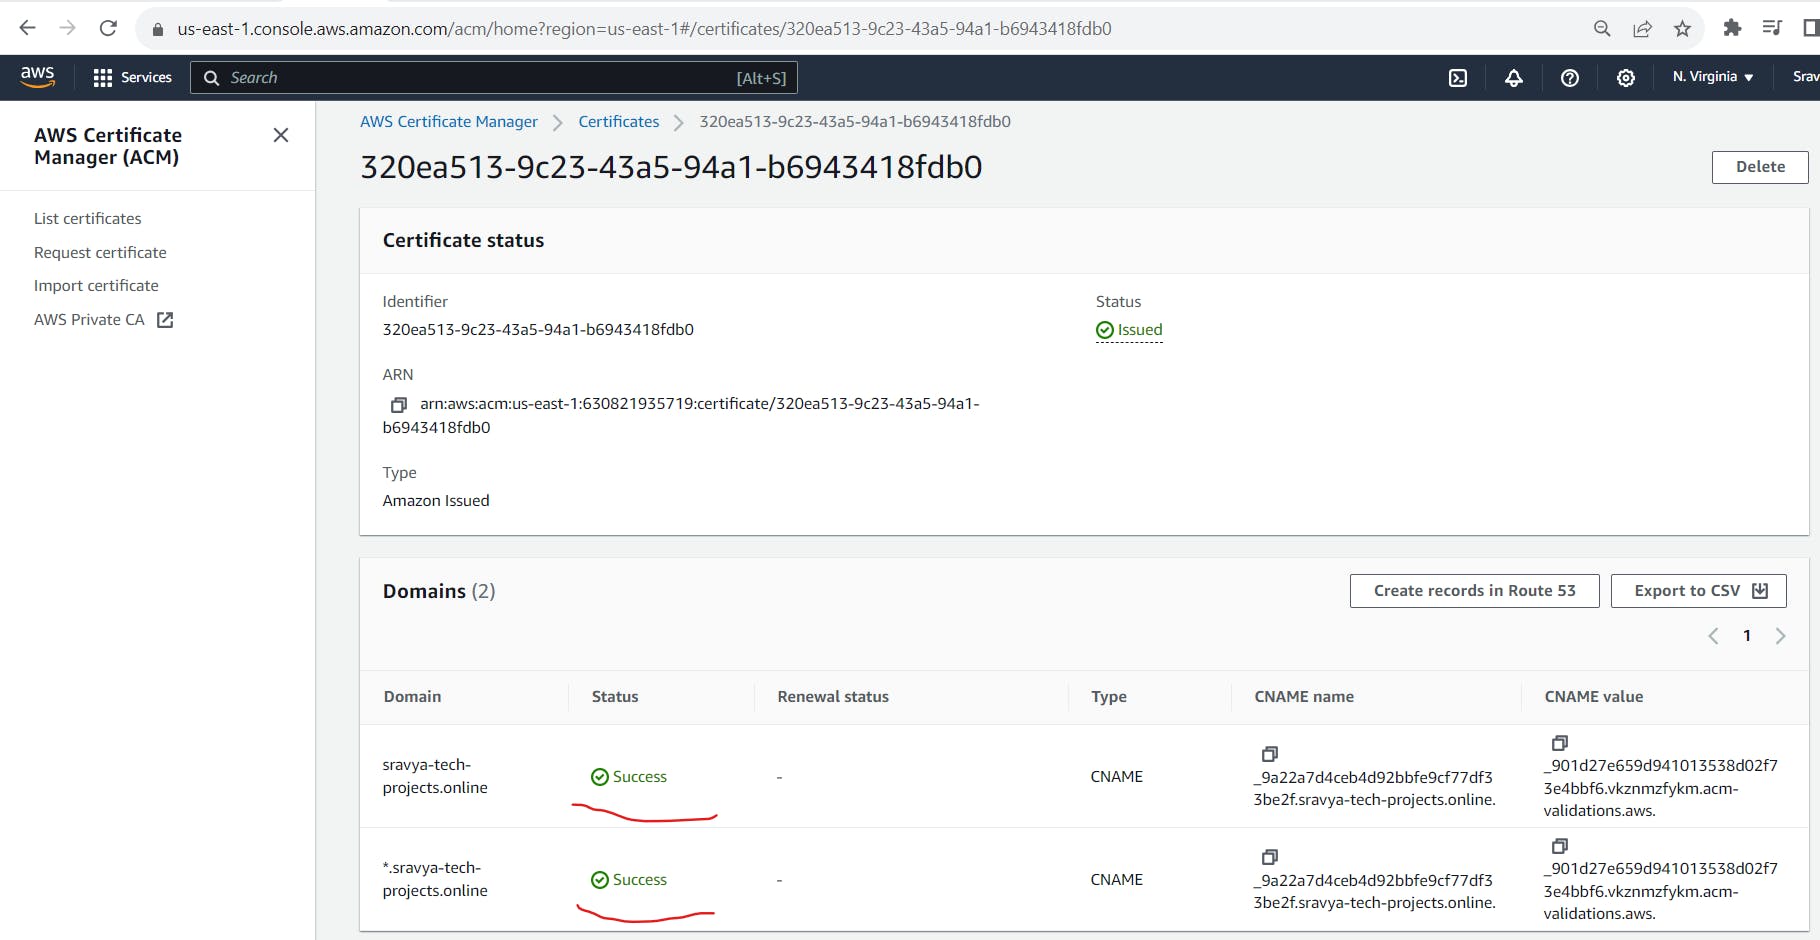
- The Certificate record updated in the Route53 hosted zone

Launch an Amazon EC2 Instances:
Log in to your AWS Management Console.
Navigate to the EC2 dashboard.
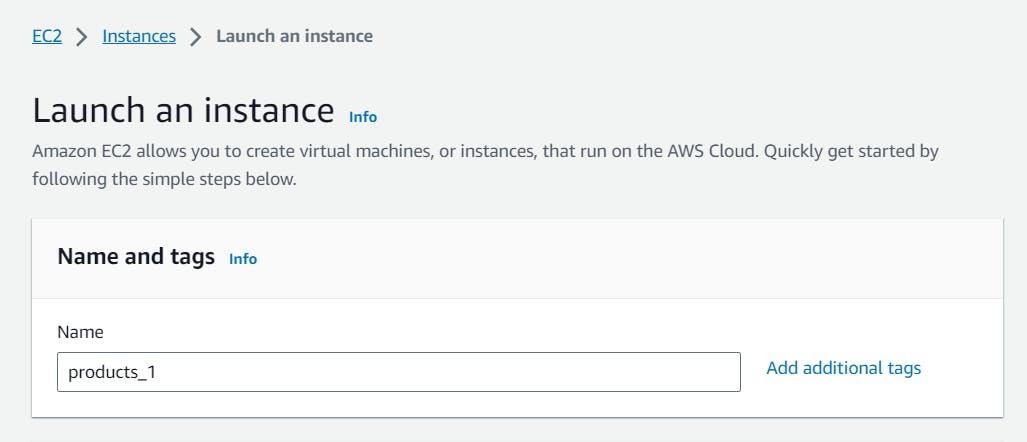
Click "Launch Instance" to create a new 4 EC2 instances for 2 products EC2 instances and 2 orders EC2 instances.
Create products_1 EC2 instance:
- Give a name to the products_1 EC2 instance as products_1
- Choose an Amazon Machine Image (AMI): Select an Amazon Linux AMI or your preferred Linux distribution.
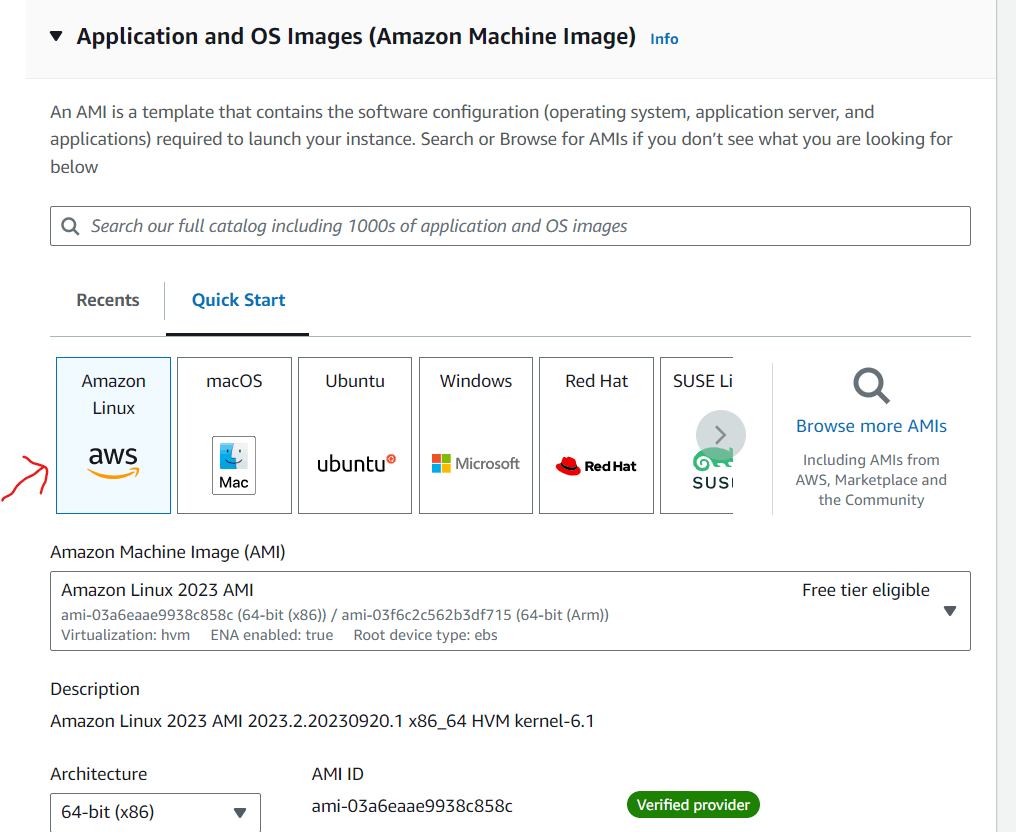
- Choose an instance type based on your requirements. I have selected for t2.micro
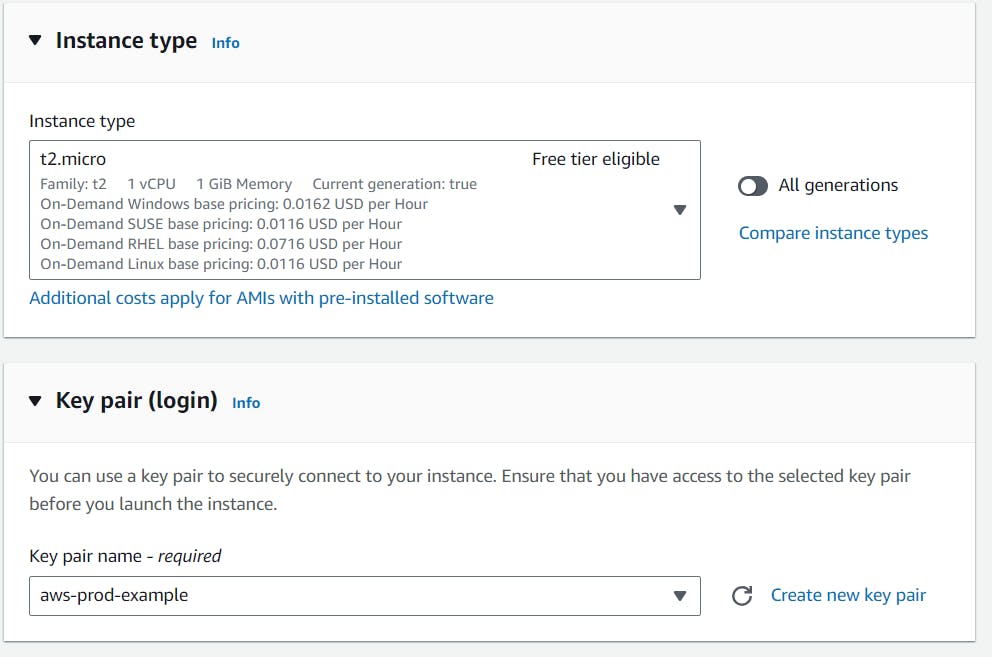
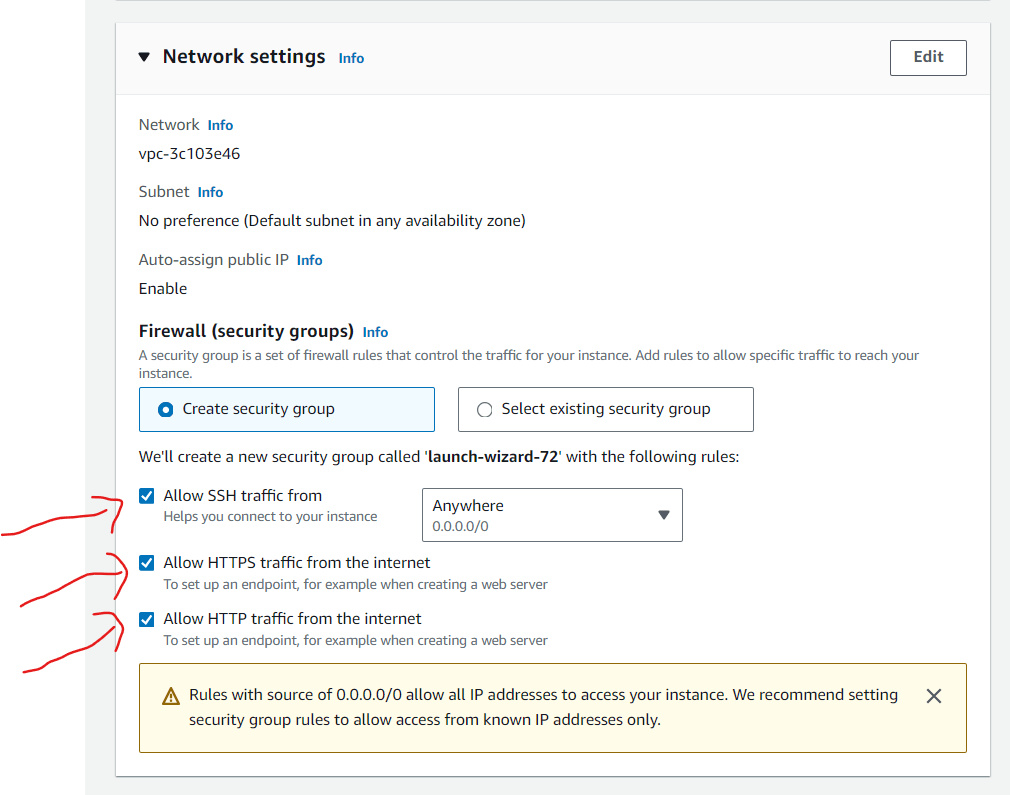
Configure instance details (e.g., VPC, subnet, security group).
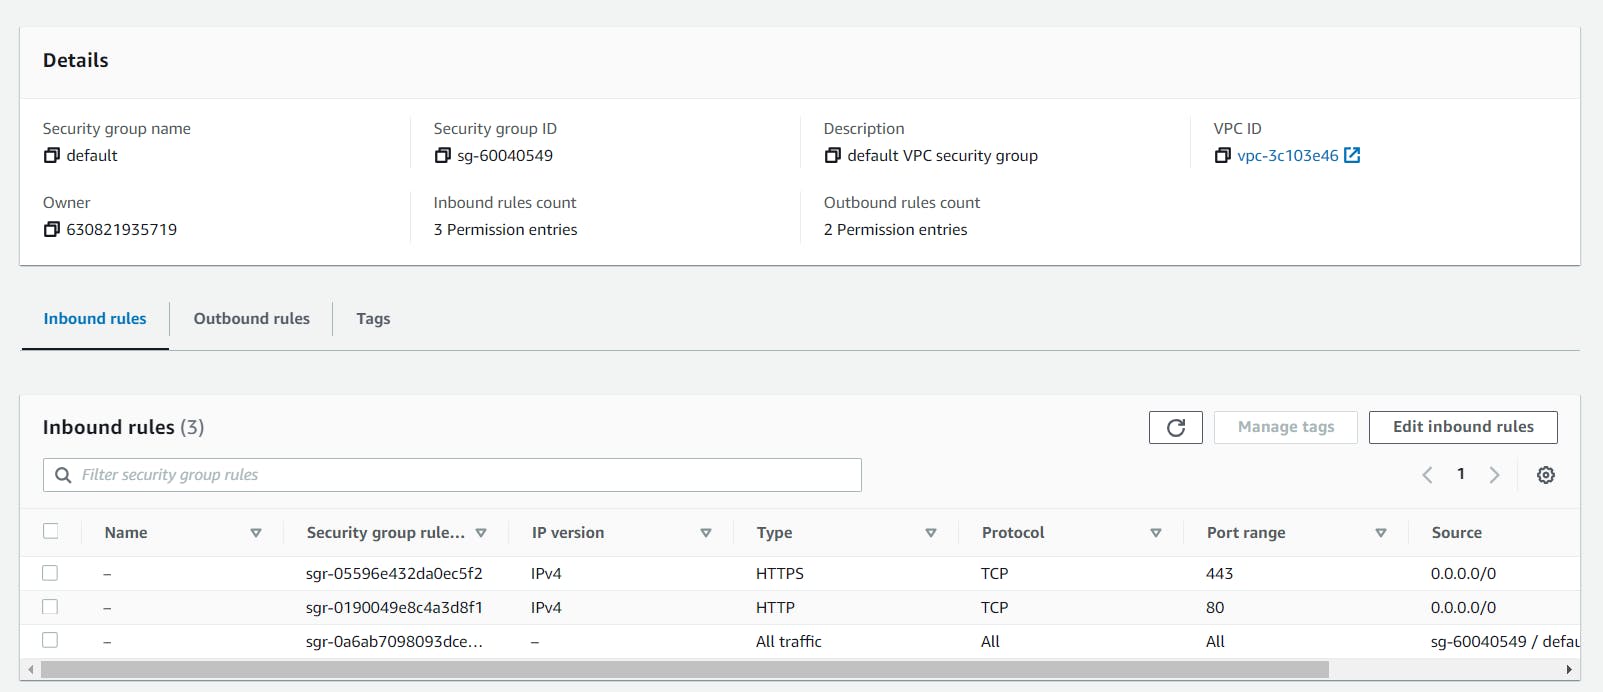
In Security Group we need to allow HTTPS traffic port (443) to allow HTTPS traffic.
- Add User Data Script: In the "User data" field, enter the below script to update the package repository, install the Apache HTTP Server (httpd), start the httpd service, configure it to start automatically on boot and create a sample HTML file for the products_1 page
#!/bin/bash
yum update -y
yum install -y httpd
service httpd start
service httpd status
chkconfig httpd on
cd /var/www/html
mkdir products
cd /var/www/html/products
# Create an HTML file with a background color
cat <<EOF > index.html
<!DOCTYPE html>
<html>
<head>
<title>Products_1 EC2 instance</title>
</head>
<body style="background-color: #F0E68C;"> <!-- Set the background color here -->
<h1>Products Page</h1>
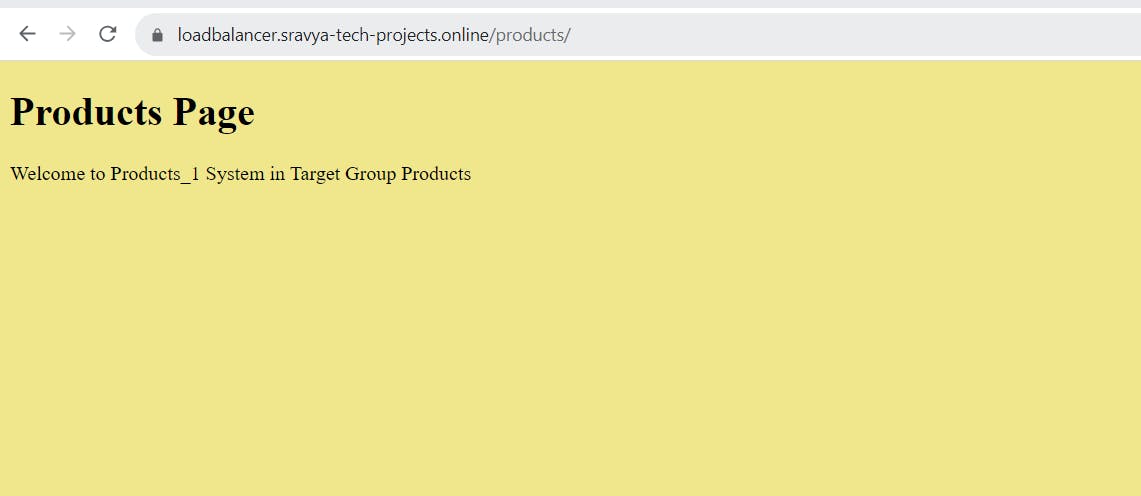
<p>Welcome to Products_1 System in Target Group Products</p>
</body>
</html>
EOF
# Restart the Apache web server to apply changes
service httpd restart
- Launch the EC2 Instance: Review your instance settings and click "Launch."
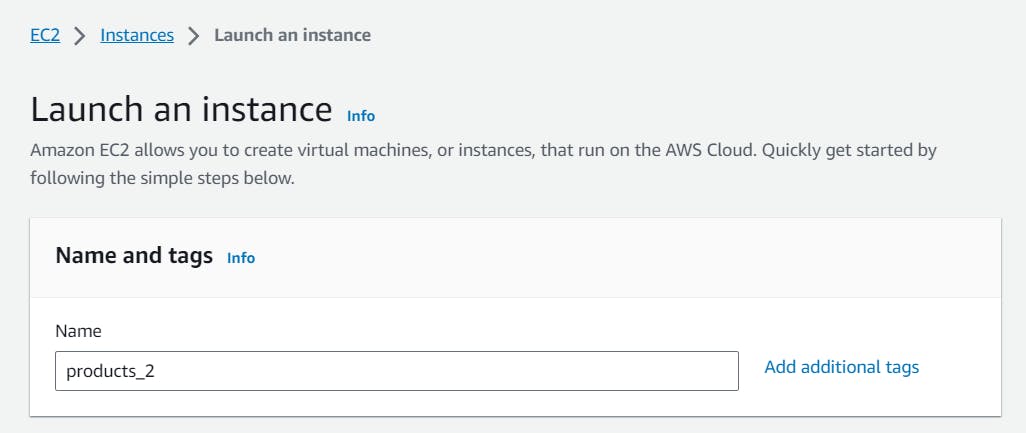
Create products_2 EC2 instance:
- Give a name to the products_2 EC2 instance as products_2
Follow the above steps to configure the further steps for creating the products_2 EC2 instance
Add User Data Script: In the "User data" field, enter the below script to update the package repository, install the Apache HTTP Server (httpd), start the httpd service, configure it to start automatically on boot and create a sample HTML file for the products_2 page
#!/bin/bash
yum update -y
yum install -y httpd
service httpd start
service httpd status
chkconfig httpd on
cd /var/www/html
mkdir products
cd /var/www/html/products
# Create an HTML file with a background color
cat <<EOF > index.html
<!DOCTYPE html>
<html>
<head>
<title>Products_2 EC2 instance</title>
</head>
<body style="background-color: #F0E68C;"> <!-- Set the background color here -->
<h1>Products Page</h1>
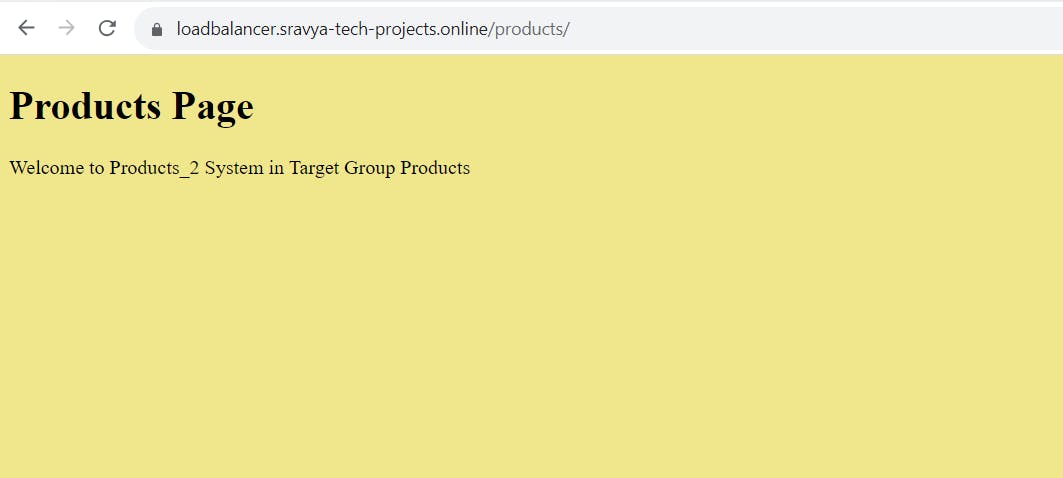
<p>Welcome to Products_2 System in Target Group Products</p>
</body>
</html>
EOF
# Restart the Apache web server to apply changes
service httpd restart
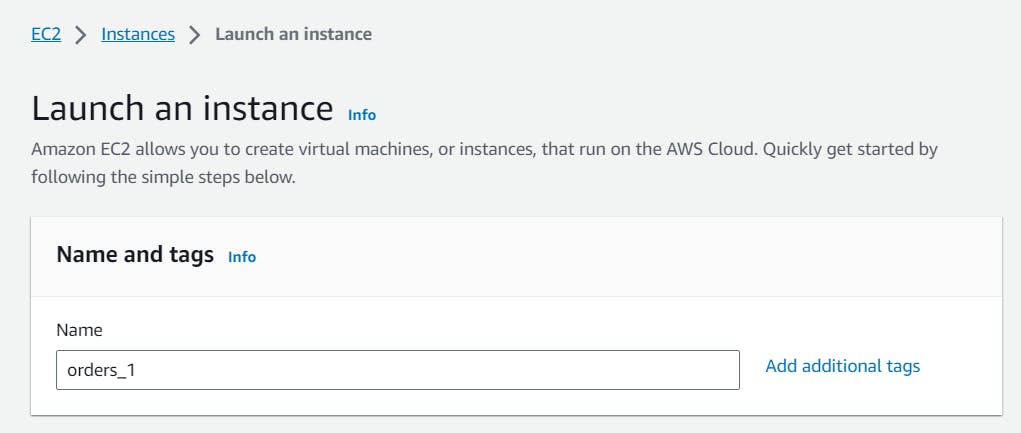
Create orders_1 EC2 instance:
- Give a name to the orders_1 EC2 instance as orders_1
Follow the above steps to configure the further steps for creating the orders_1 EC2 instance
Add User Data Script: In the "User data" field, enter the below script to update the package repository, install the Apache HTTP Server (httpd), start the httpd service, configure it to start automatically on boot and create a sample HTML file for the orders_1 page
#!/bin/bash
yum update -y
yum install -y httpd
service httpd start
service httpd status
chkconfig httpd on
cd /var/www/html

mkdir orders
cd /var/www/html/orders

# Create an HTML file with a background color
cat <<EOF > index.html
<!DOCTYPE html>
<html>
<head>
    <title>Orders_1 EC2 instance</title>
</head>
<body style="background-color: #F0E68C;"> <!-- Set the background color here -->
    <h1>Orders Page</h1>
    <p>Welcome to Orders_1 System in Target Group Products</p>
</body>
</html>
EOF

# Restart the Apache web server to apply changes
service httpd restart
Create orders_2 EC2 instance:
Give a name to the orders_2 EC2 instance as orders_2
Follow the above steps to configure the further steps for creating the orders_2 EC2 instance
Add User Data Script: In the "User data" field, enter the below script to update the package repository, install the Apache HTTP Server (httpd), start the httpd service, configure it to start automatically on boot and create a sample HTML file for the orders_2 page
#!/bin/bash
yum update -y
yum install -y httpd
service httpd start
service httpd status
chkconfig httpd on
cd /var/www/html
mkdir orders
cd /var/www/html/orders
# Create an HTML file with a background color
cat <<EOF > index.html
<!DOCTYPE html>
<html>
<head>
<title>Orders_2 EC2 instance</title>
</head>
<body style="background-color: #F0E68C;"> <!-- Set the background color here -->
<h1>Orders Page</h1>
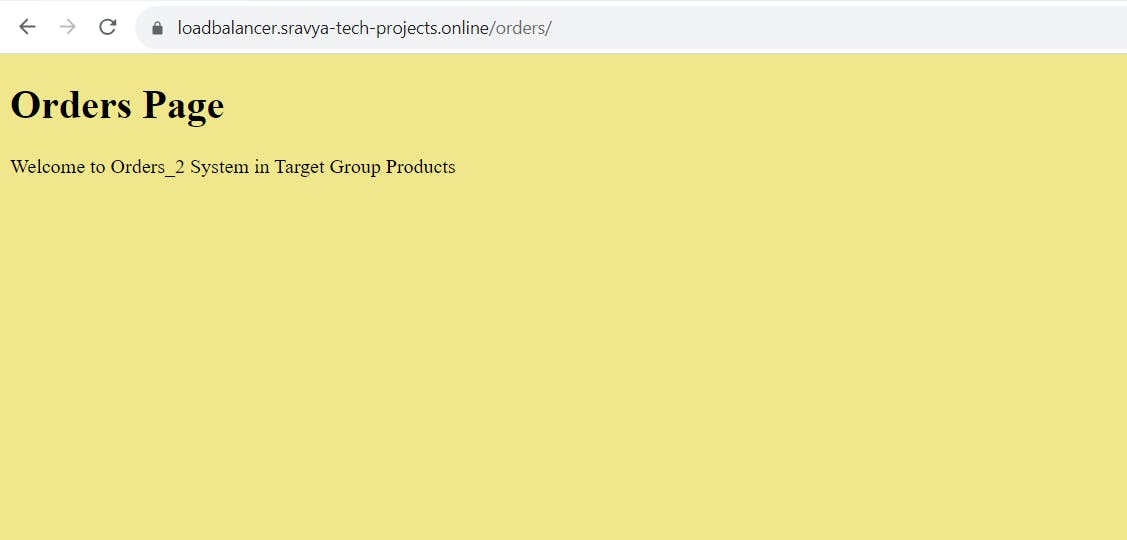
<p>Welcome to Orders_2 System in Target Group Products</p>
</body>
</html>
EOF
# Restart the Apache web server to apply changes
service httpd restart
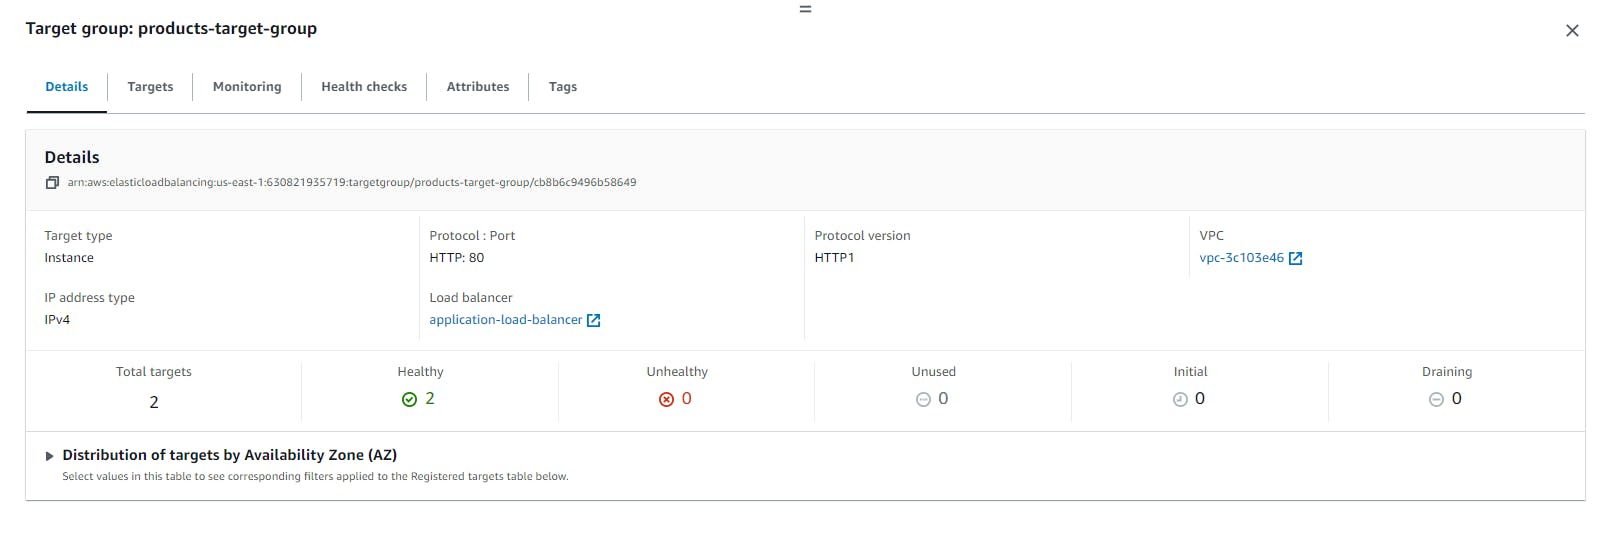
Create Target Groups
Create a New Target Group for products-target-group:
Choose the "Target type", We can select Instances if we are routing traffic to the EC2 instances or we can select IP address if we need to choose a specific IP address or we can select Lambda Function or Application load balancer.
I am selecting Instances as I am routing my traffic to EC2 instances.
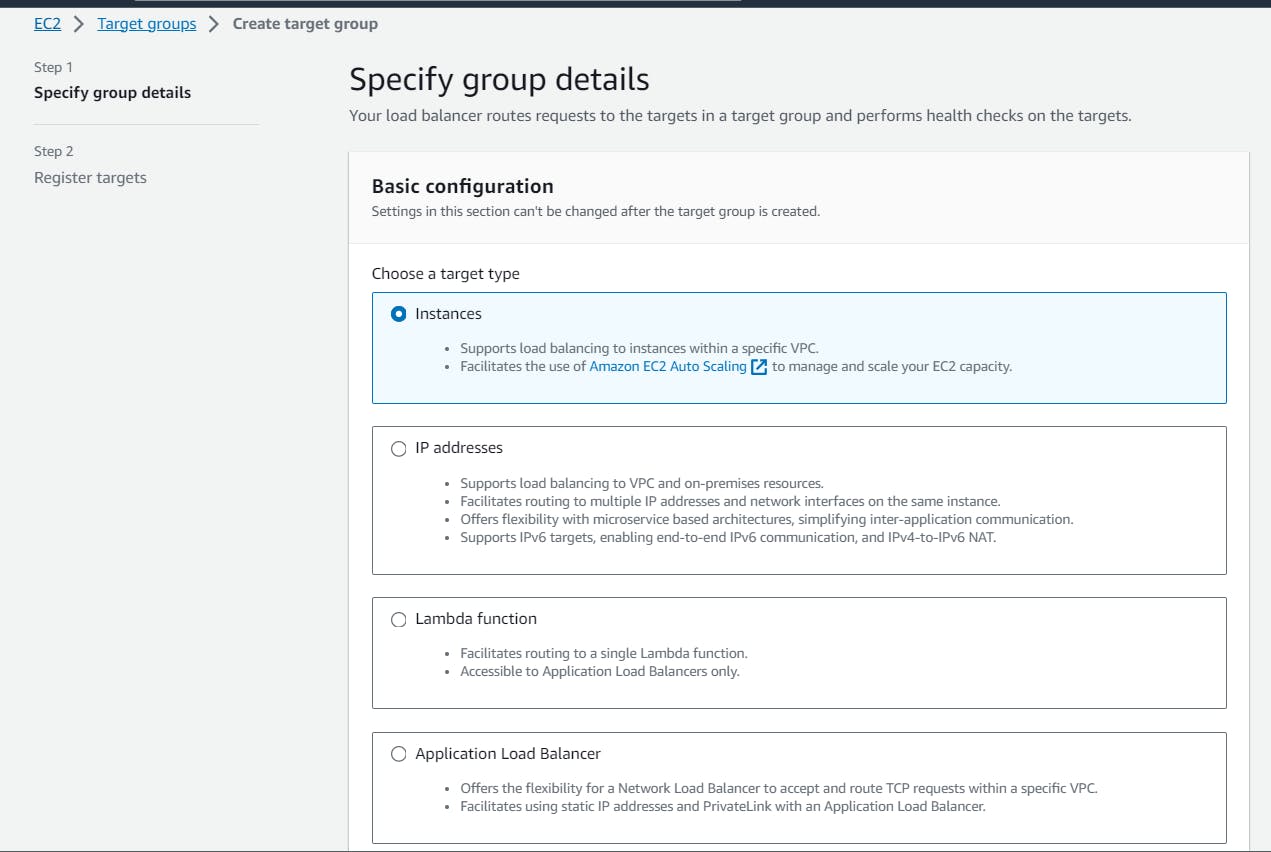
Click the "Create Target Group" button. Name it
products-target-groupand configure it like the below:- Specify the protocol and port (e.g., HTTP on port 80) as our application inside the EC2 instance running on port 80 with HTTP

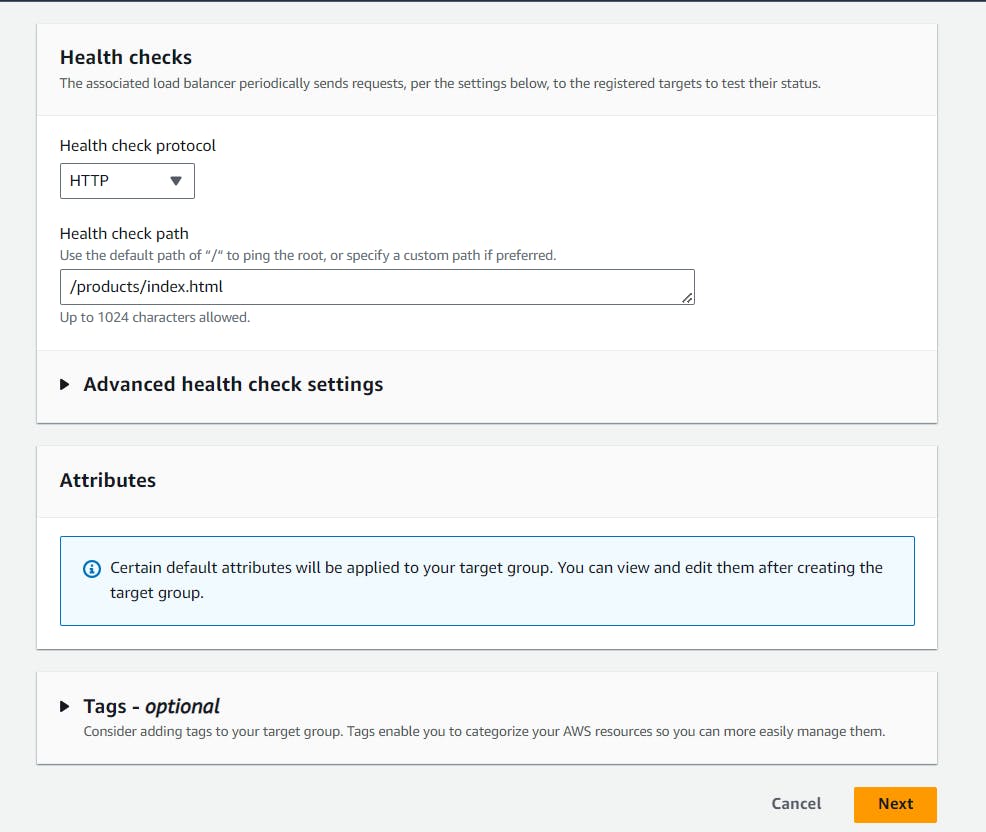
- Configure health checks: The associated load balancer periodically sends a request to the EC2 instance and checks the default path and registers the targets to test their status whether the EC2 instance is healthy or not
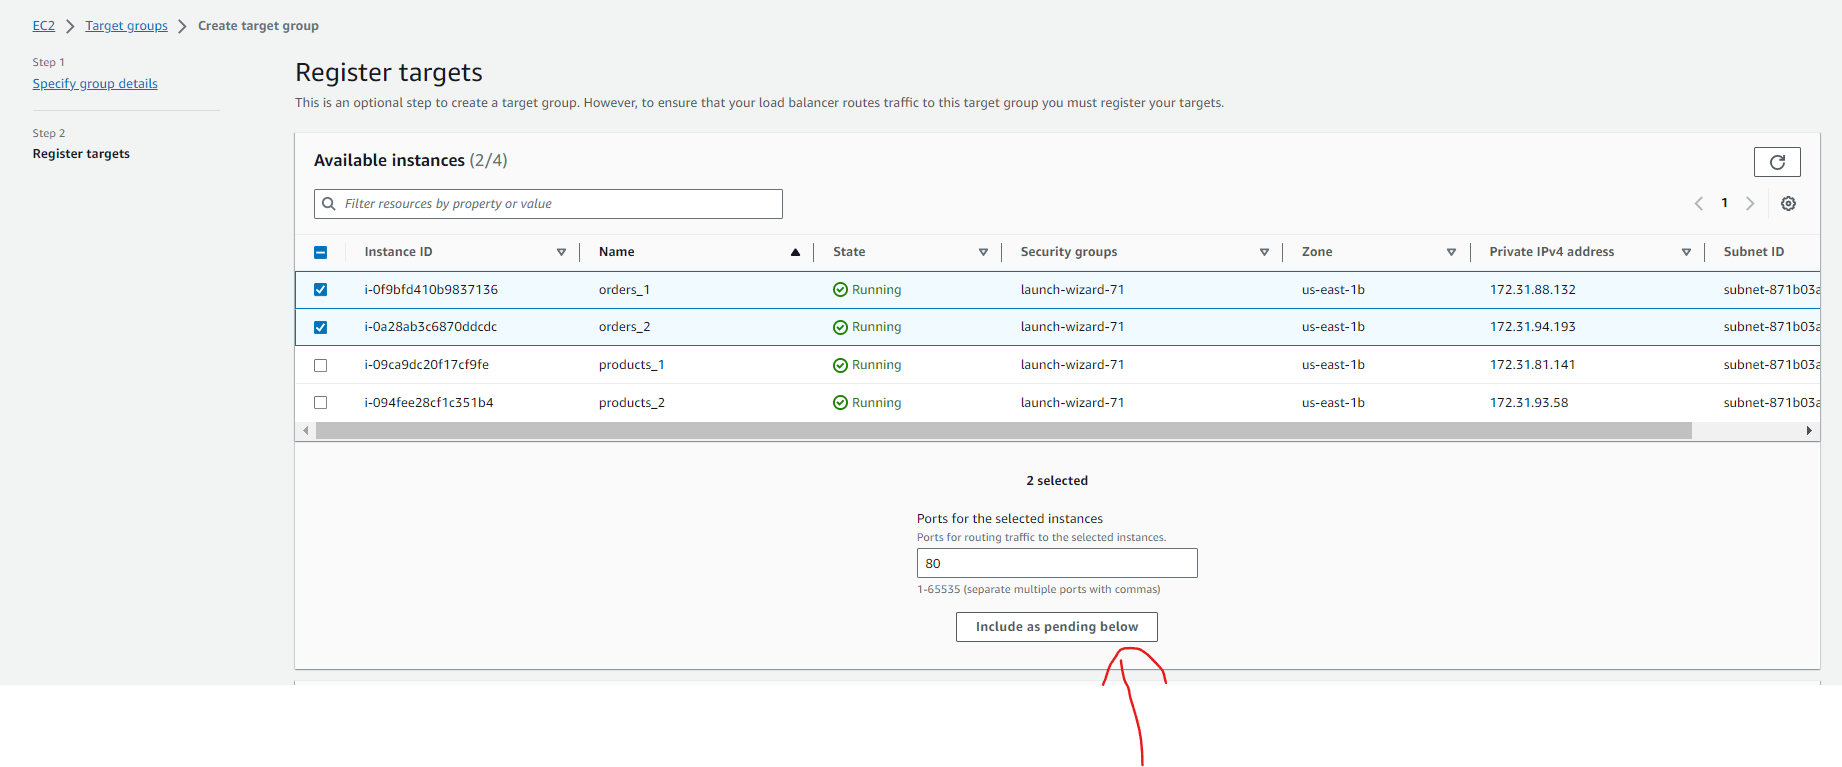
- Register Targets: Choose the EC2 instances which we want to associate with the products-target-group, and then the load balancer will send a request to the associated EC2 instances when a request comes to the /products URL and click on Include as pending below
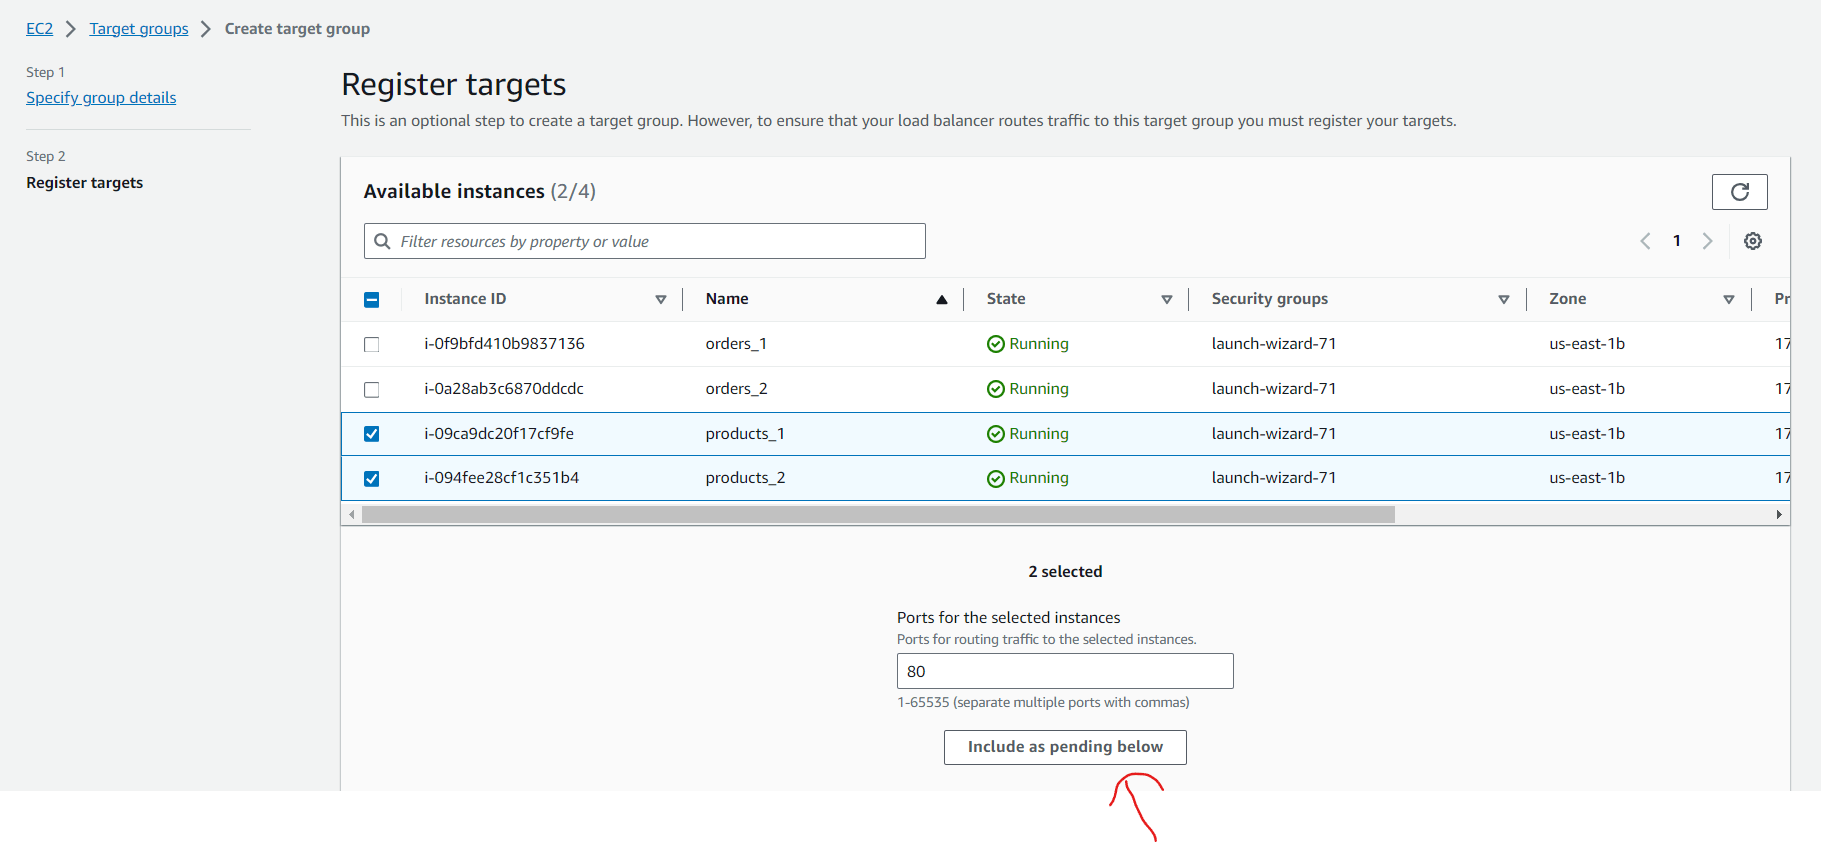
- Review Targets: Review the products EC2 instances targets and click on Create target group

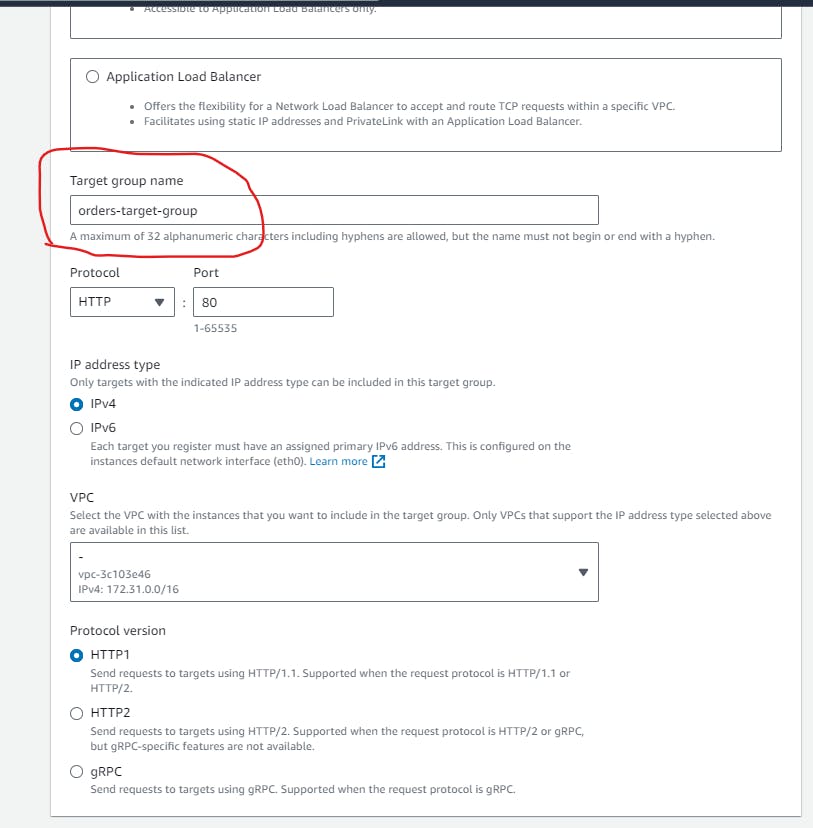
Create a New Target Group for orders-target-group:
Follow the above steps to configure the further steps for creating the orders-target-group
Click the "Create Target Group" button. Name it
orders-target-groupand configure it like the below:- Specify the protocol and port (e.g., HTTP on port 80) as our application inside the EC2 instance running on port 80 with HTTP
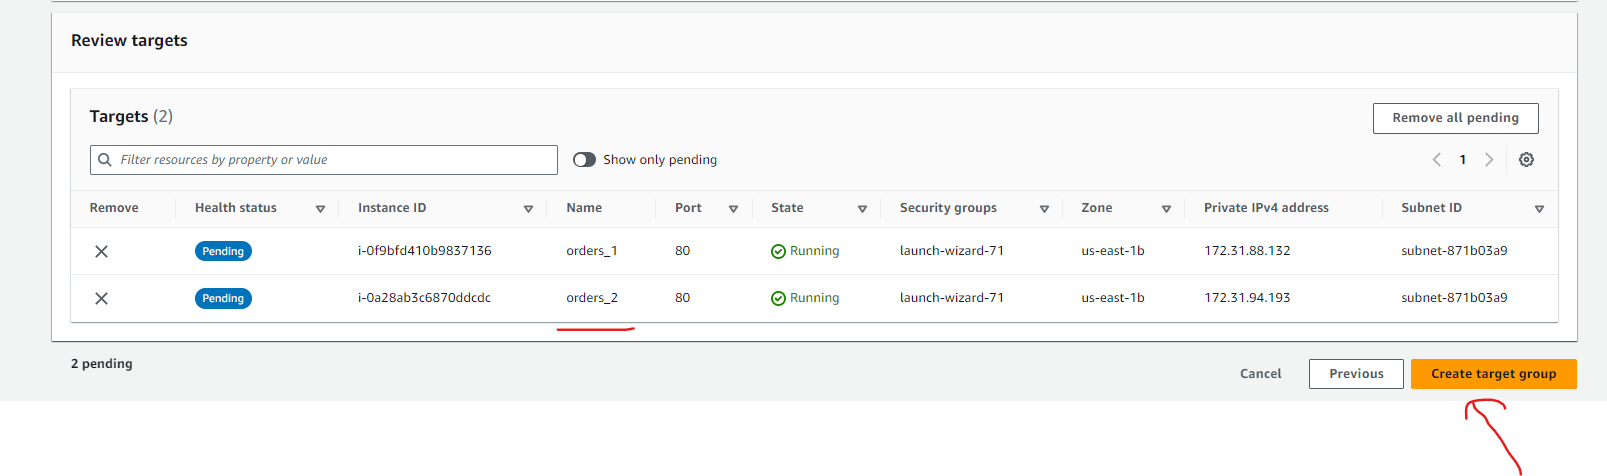
- Register Targets: Choose the EC2 instances which we want to associate with the orders-target-group, and then the load balancer will send a request to the associated EC2 instances when a request comes to the /orders URL and click on Include as pending below
- Review Targets: Review the products EC2 instances targets and click on Create target group
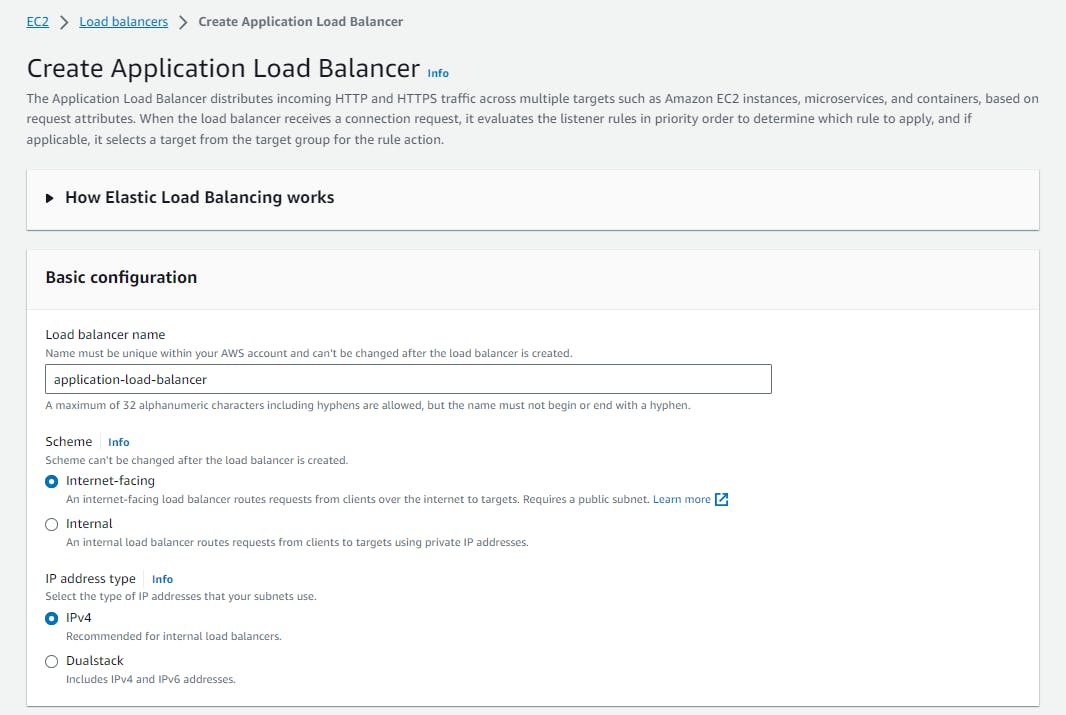
Create an Application Load Balancer (ALB)
- Click the "Create Load Balancer" button.
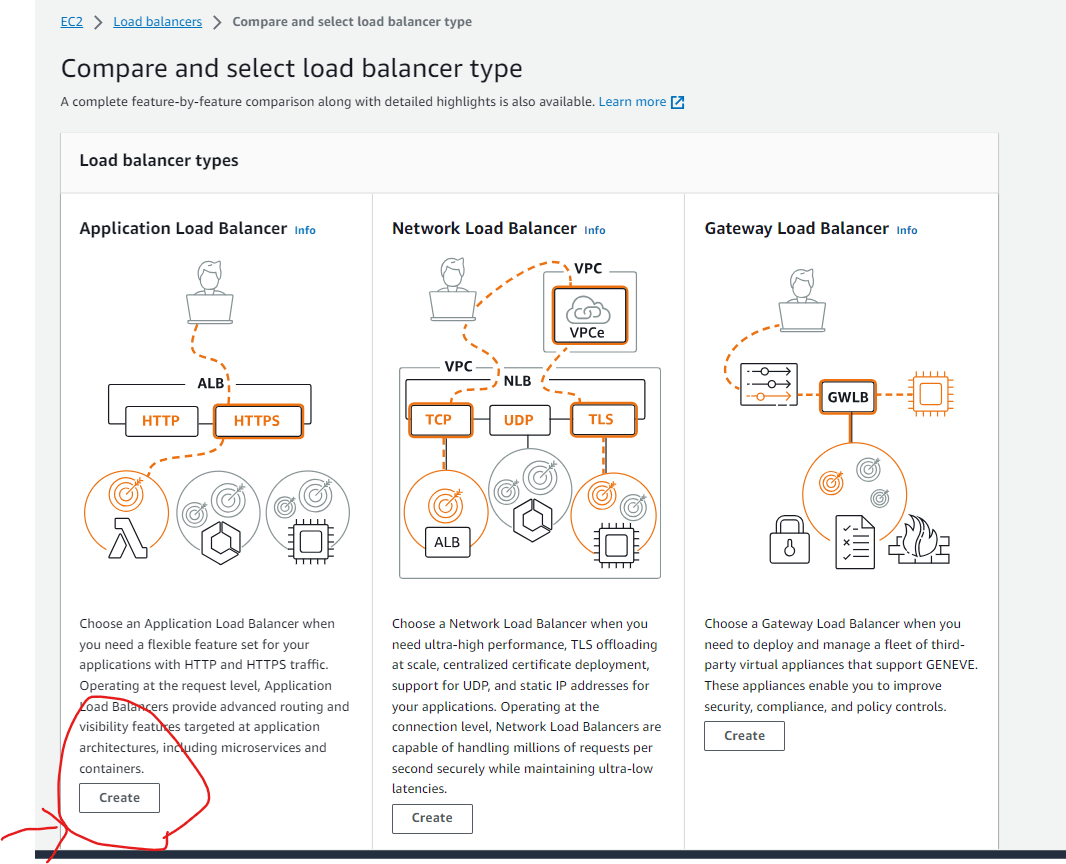
- Configure Basic Settings:
Fill out the following information:
Load Balancer Name: Give your ALB a descriptive name, e.g.,
application-load-balancer.Scheme: Choose "internet-facing" for public access.
IP Address Type: Select "ipv4" unless you have specific ipv6 requirements.
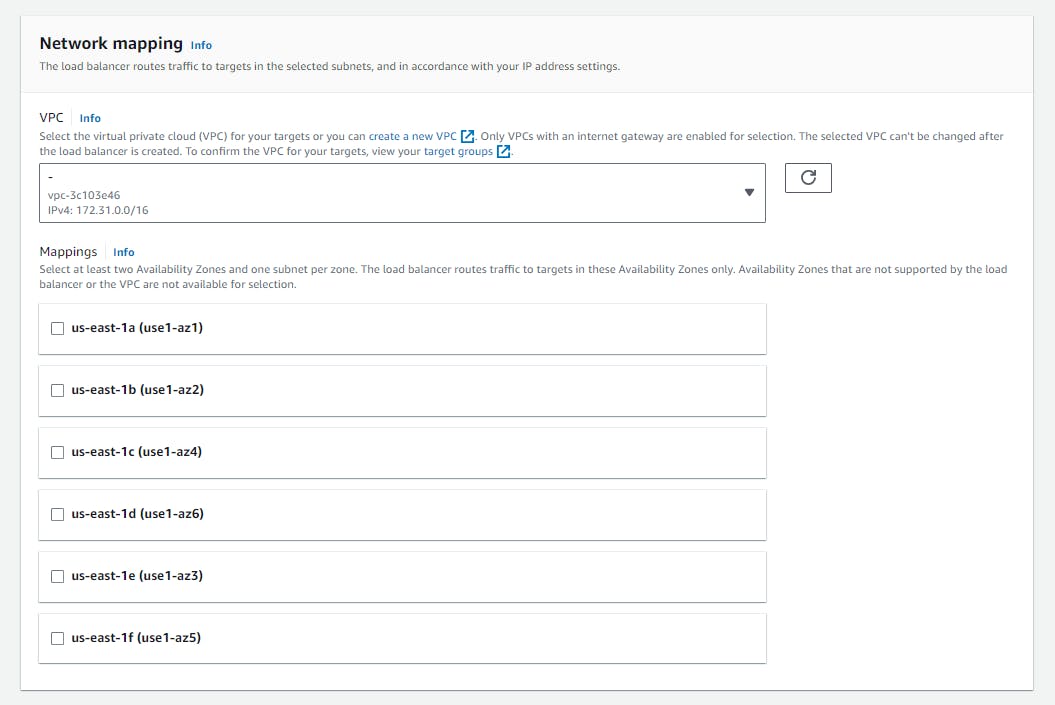
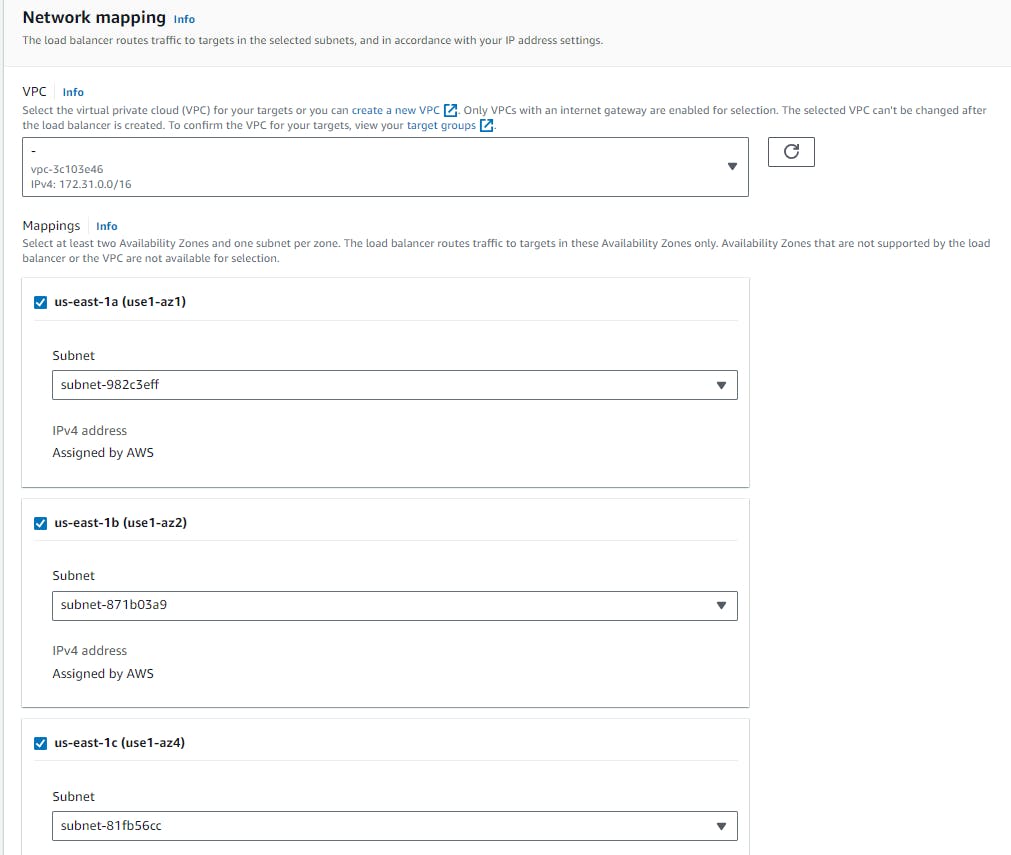
Network Mapping:
- Select at least 2 availability zones so that the load balancer will route the traffic to targets in those availability zones only
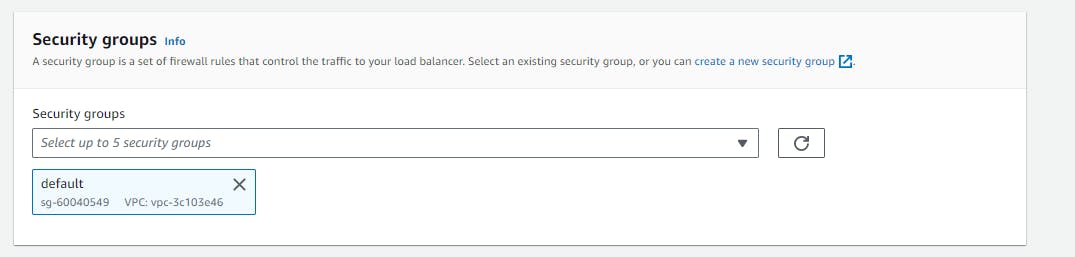
Configure Security Groups:
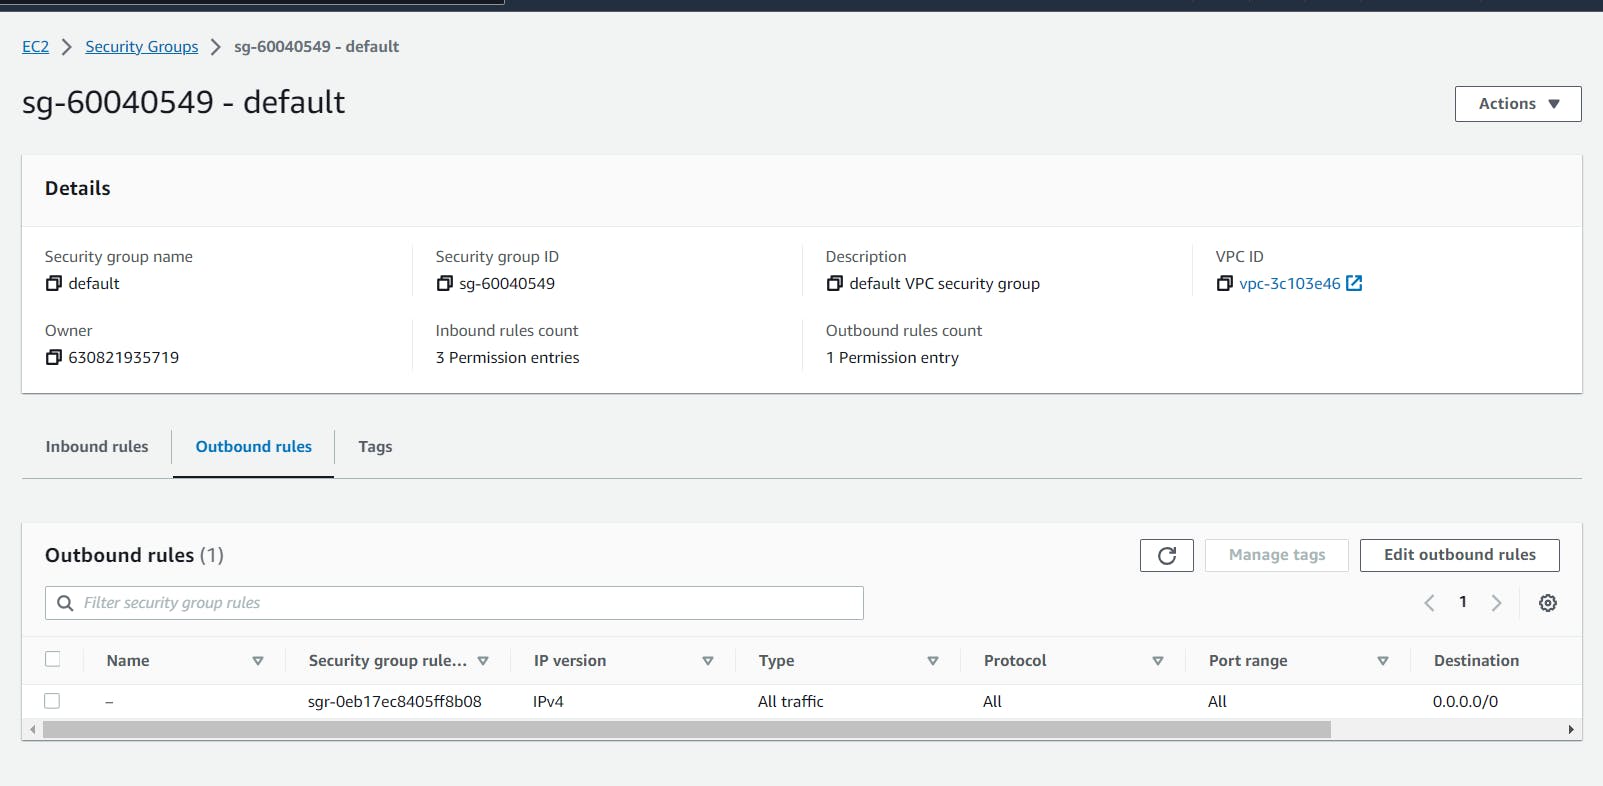
Choose an existing security group or create a new one. This security group controls the inbound and outbound traffic for your ALB.
Allow HTTPS Port (443) to allowing HTTPS traffic
Configure Listeners:
Set up your listeners based on your application's requirements. For example:
Add a listener for HTTP (port 80) and HTTPS (port 443) if you're using SSL/TLS.
Add the target group name under the default action for forwarding the default requests to the specific target group
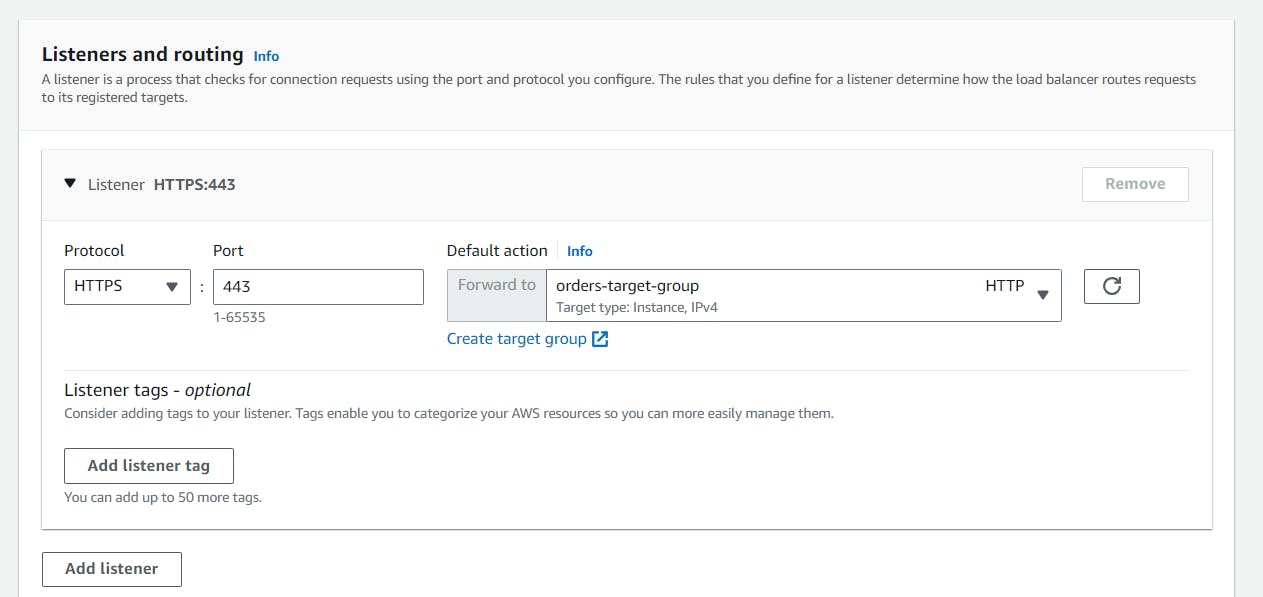
- Add created SSL ACM Certificate to Listener for HTTPS requests
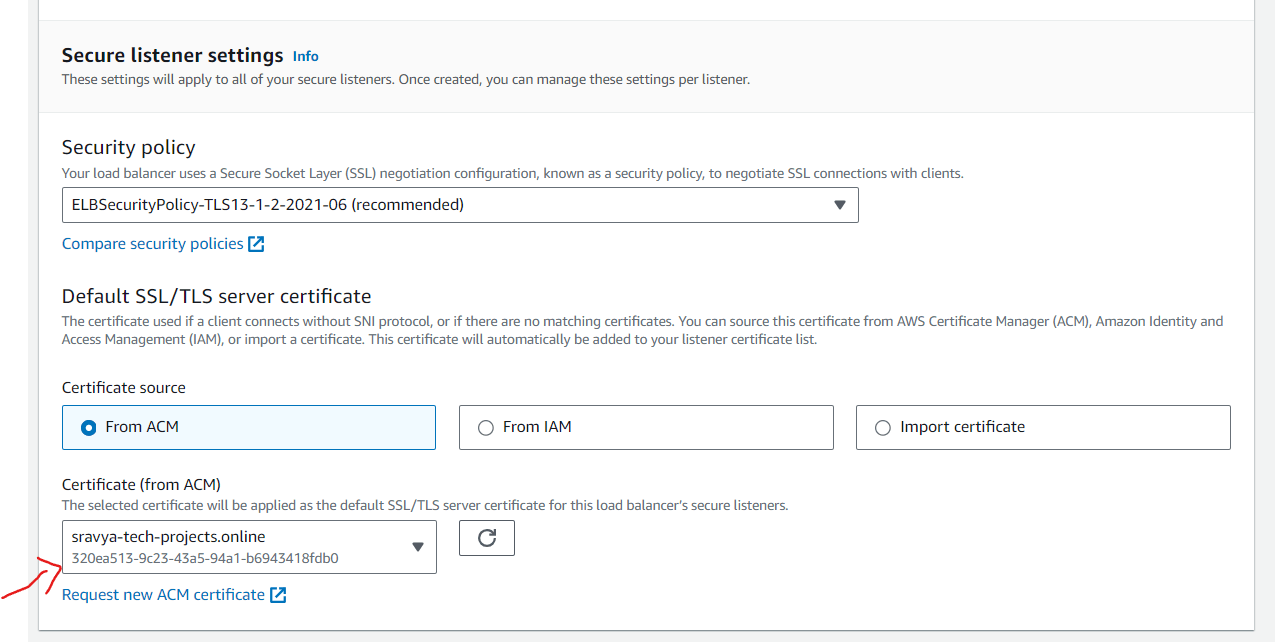
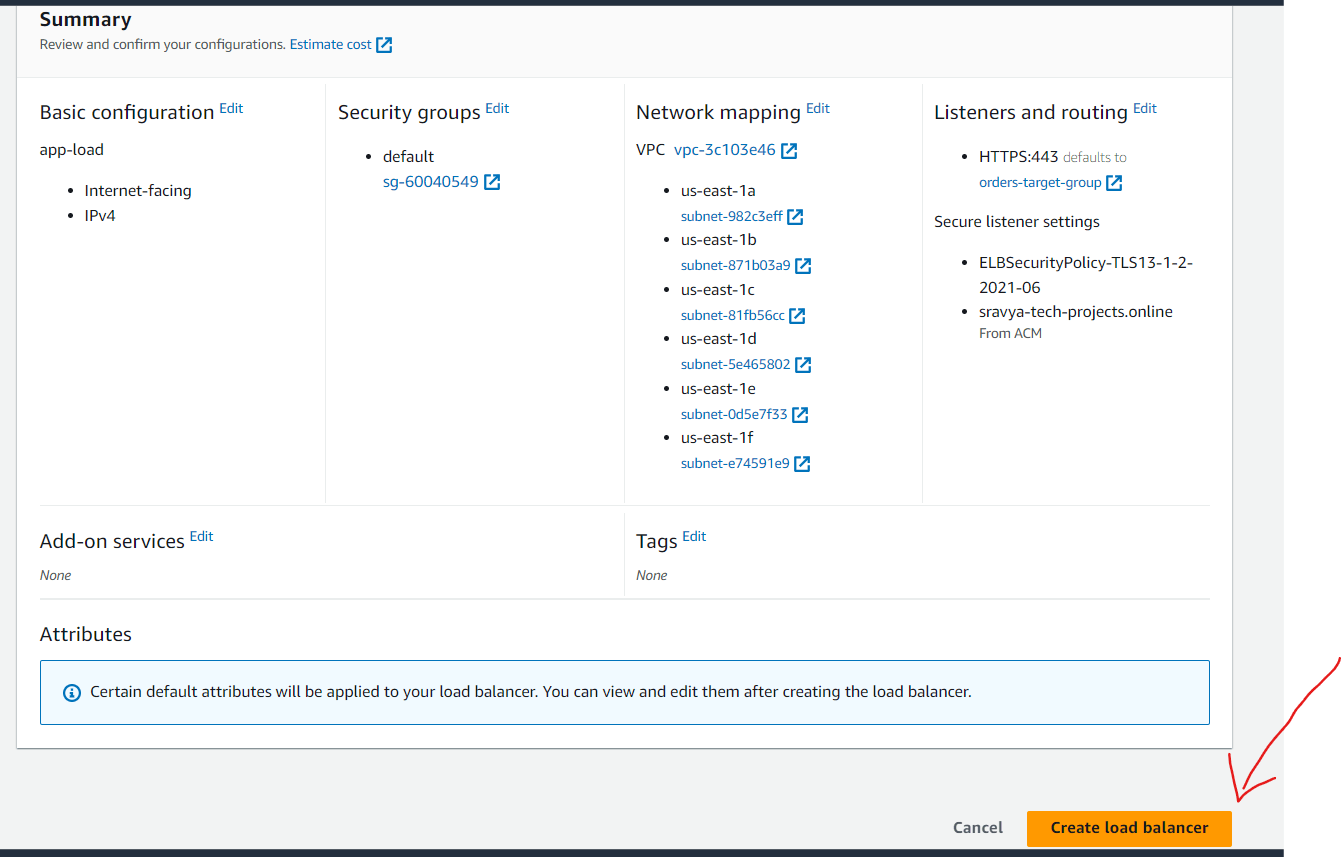
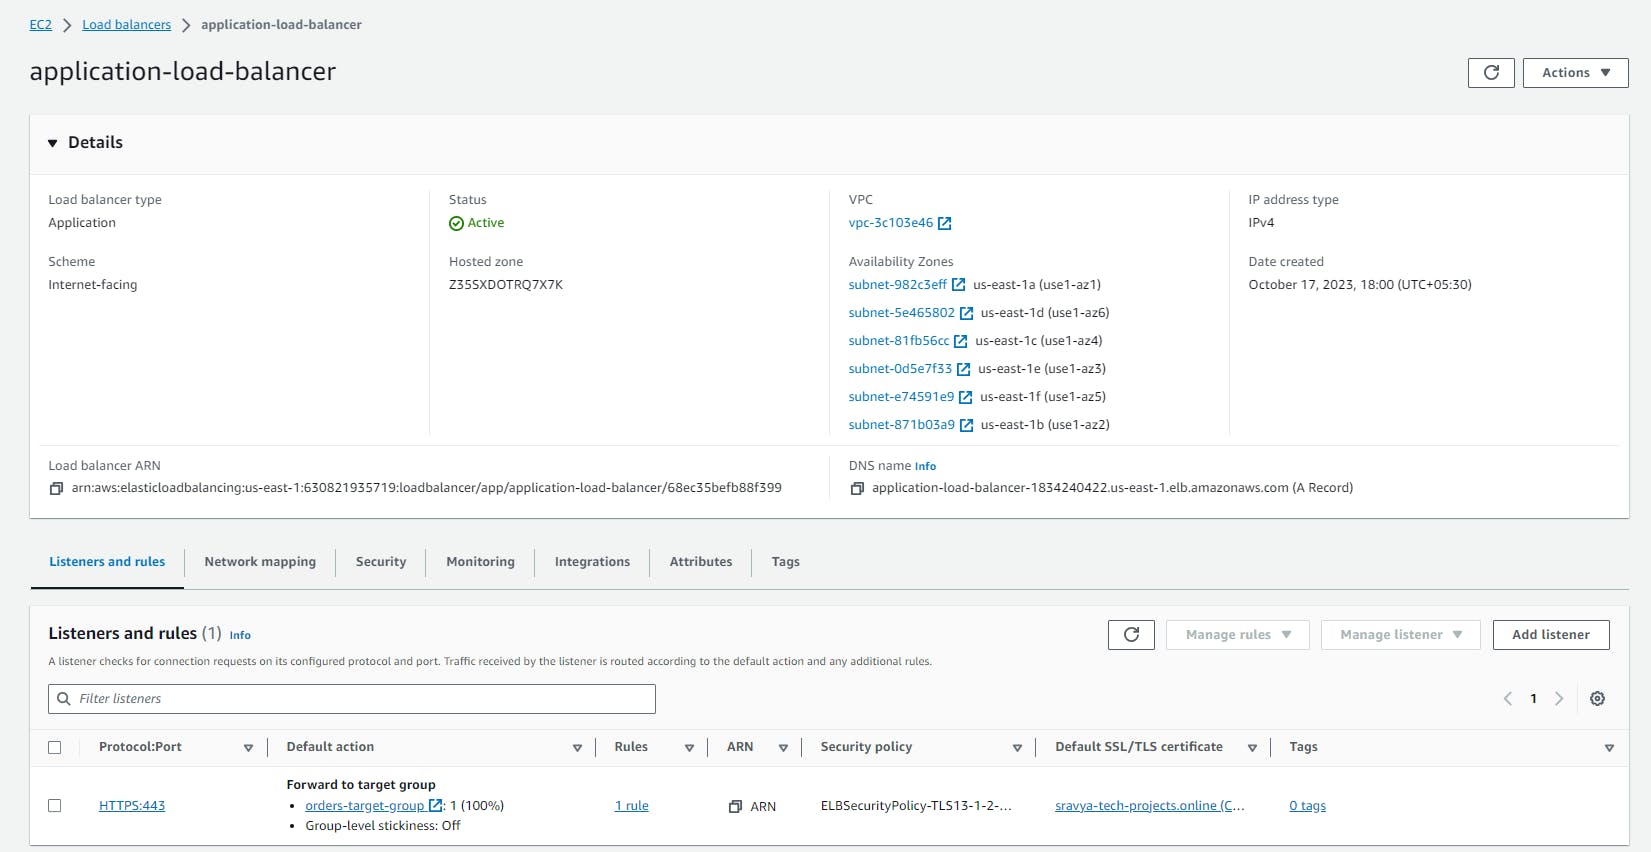
- Review Load Balancer: Review Configurations and Click on Create Load Balancer.
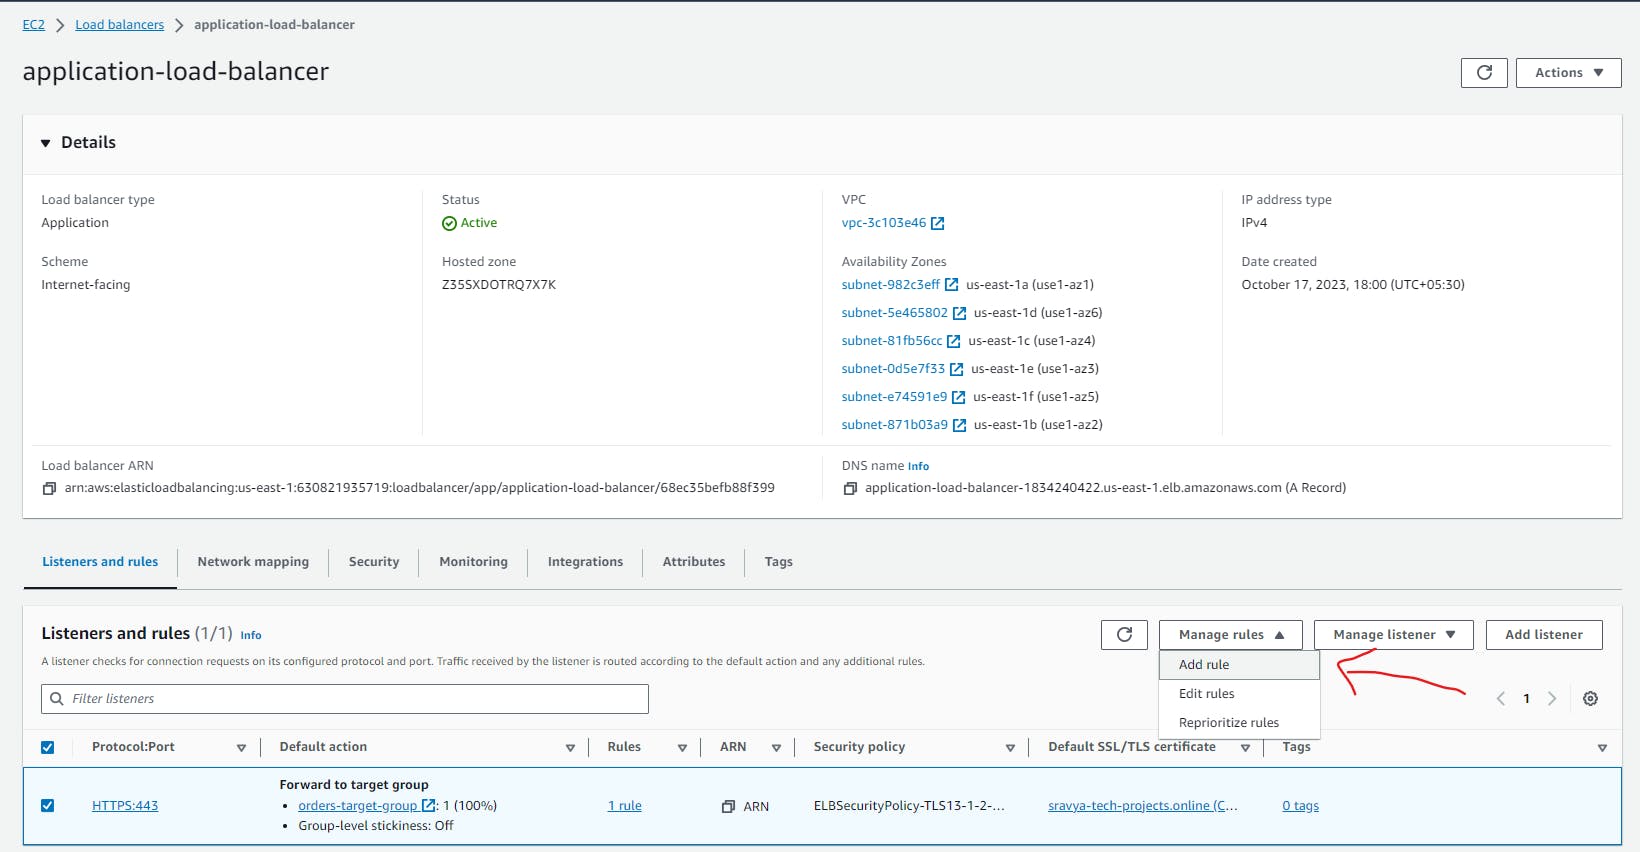
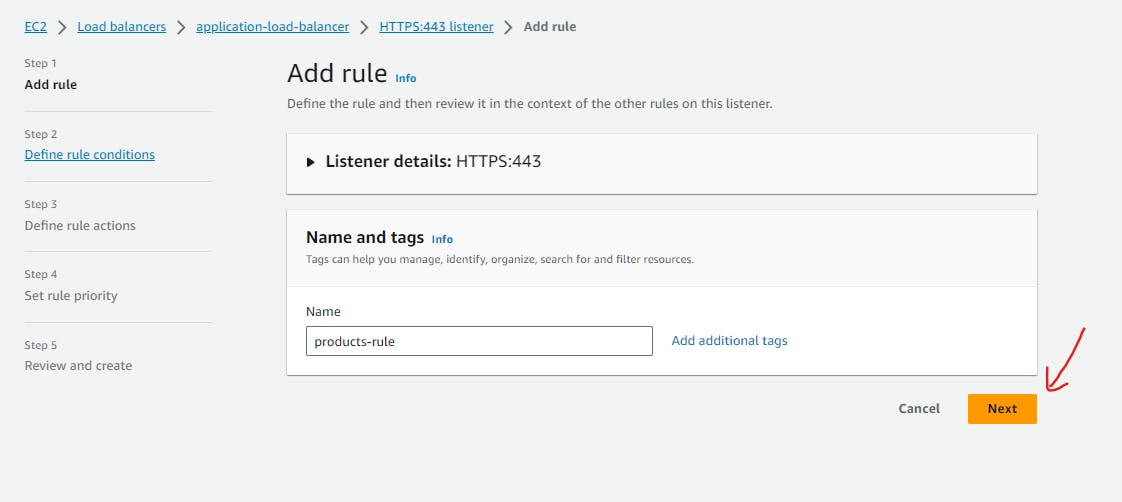
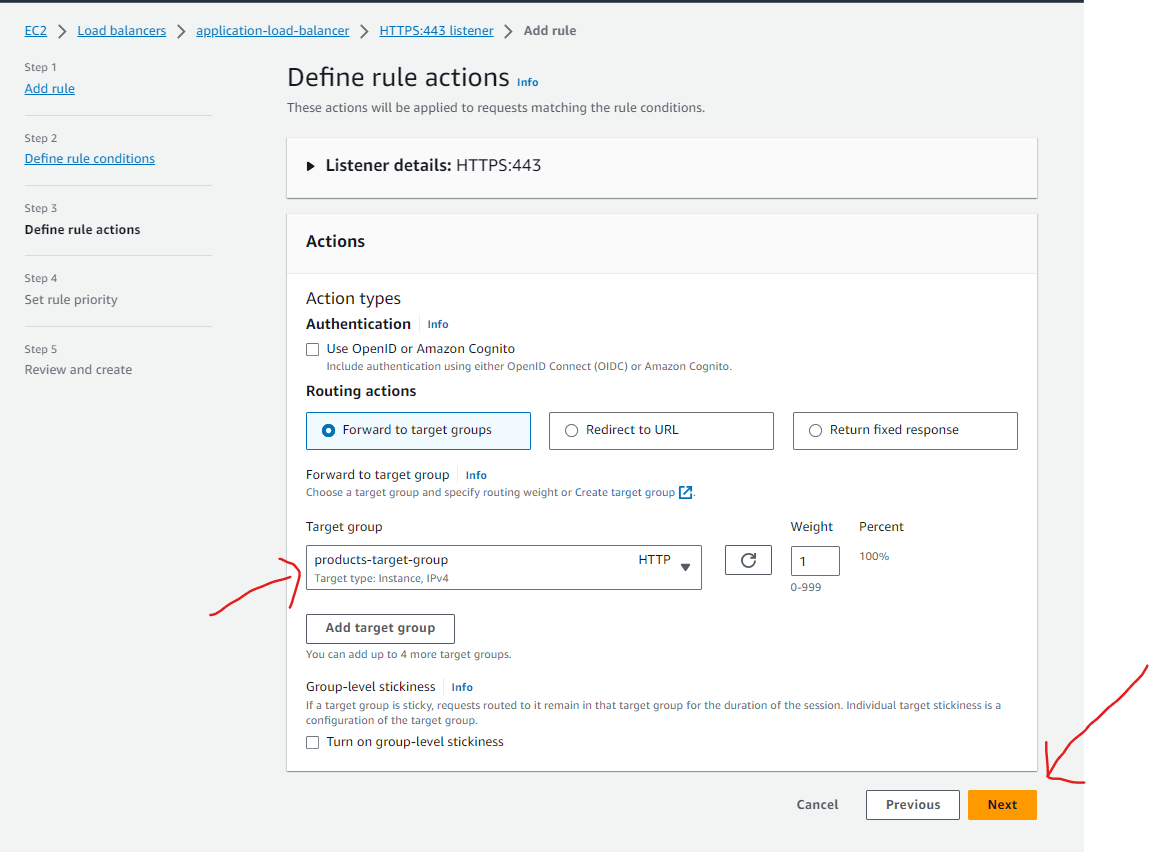
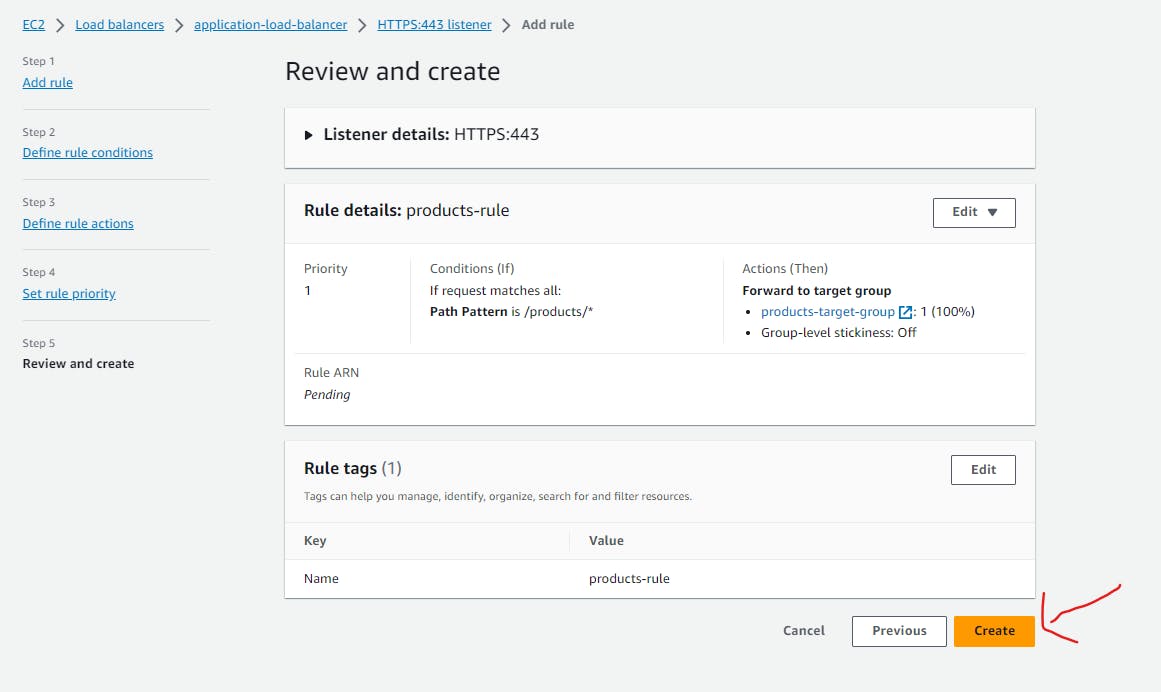
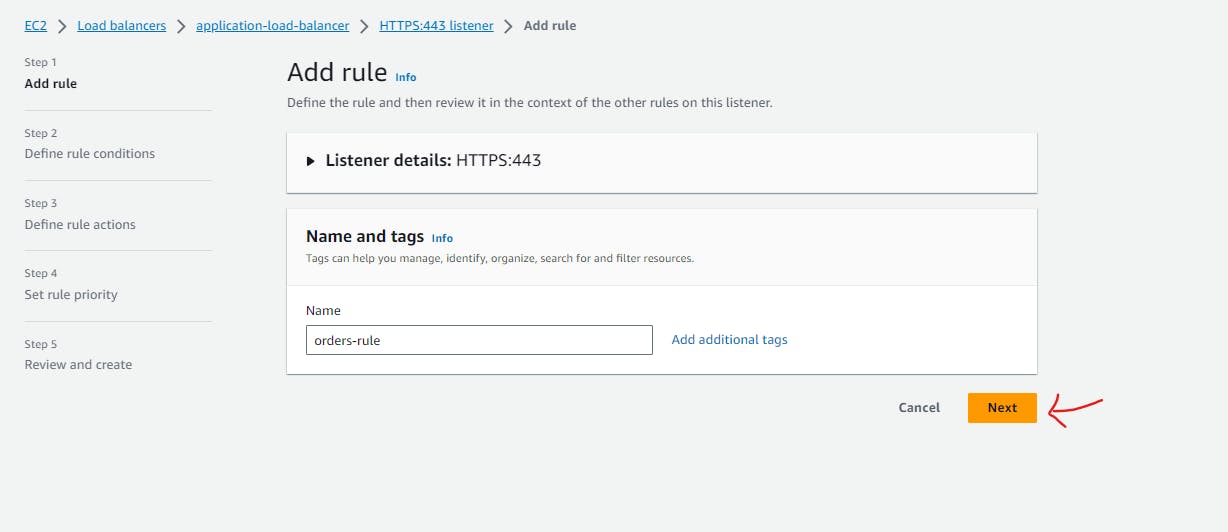
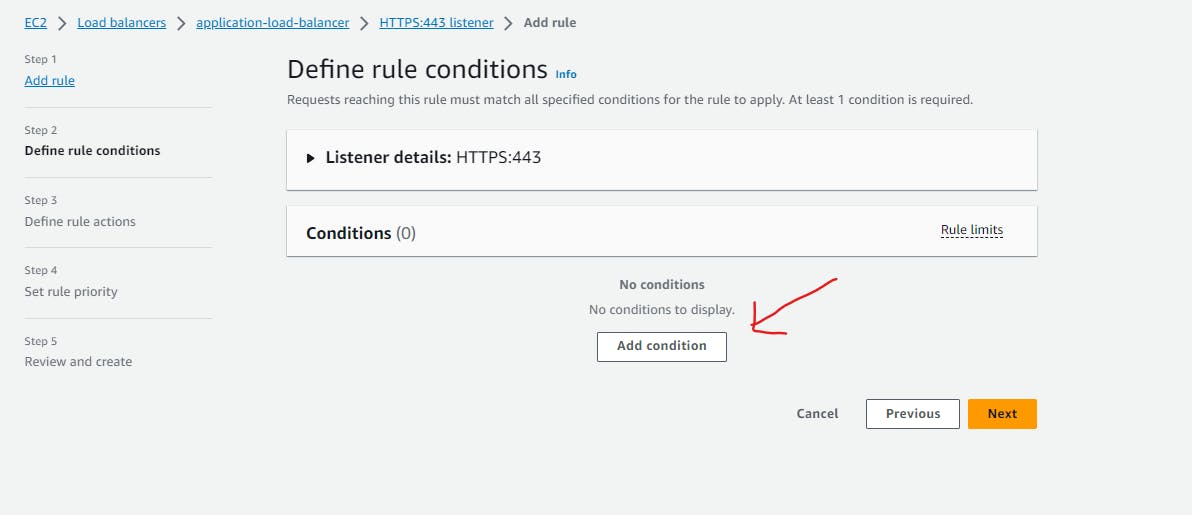
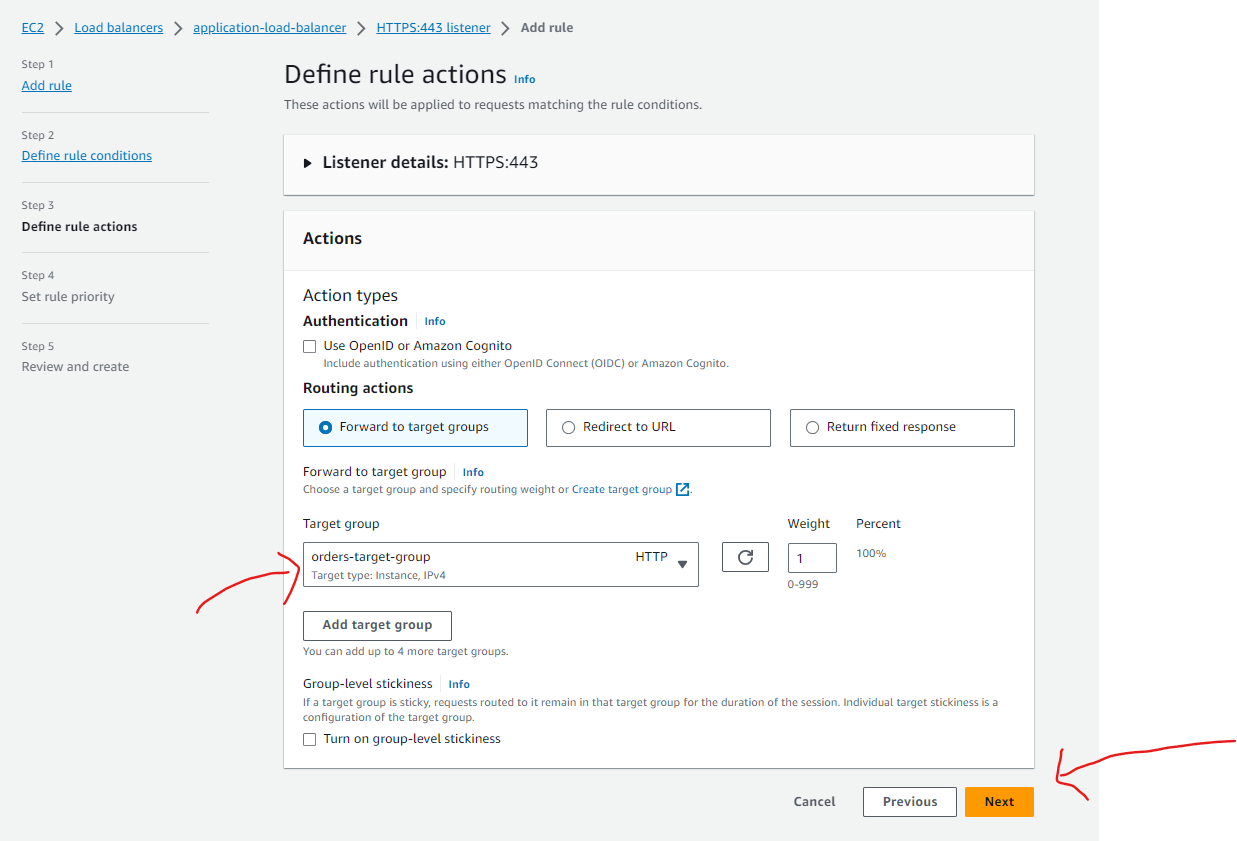
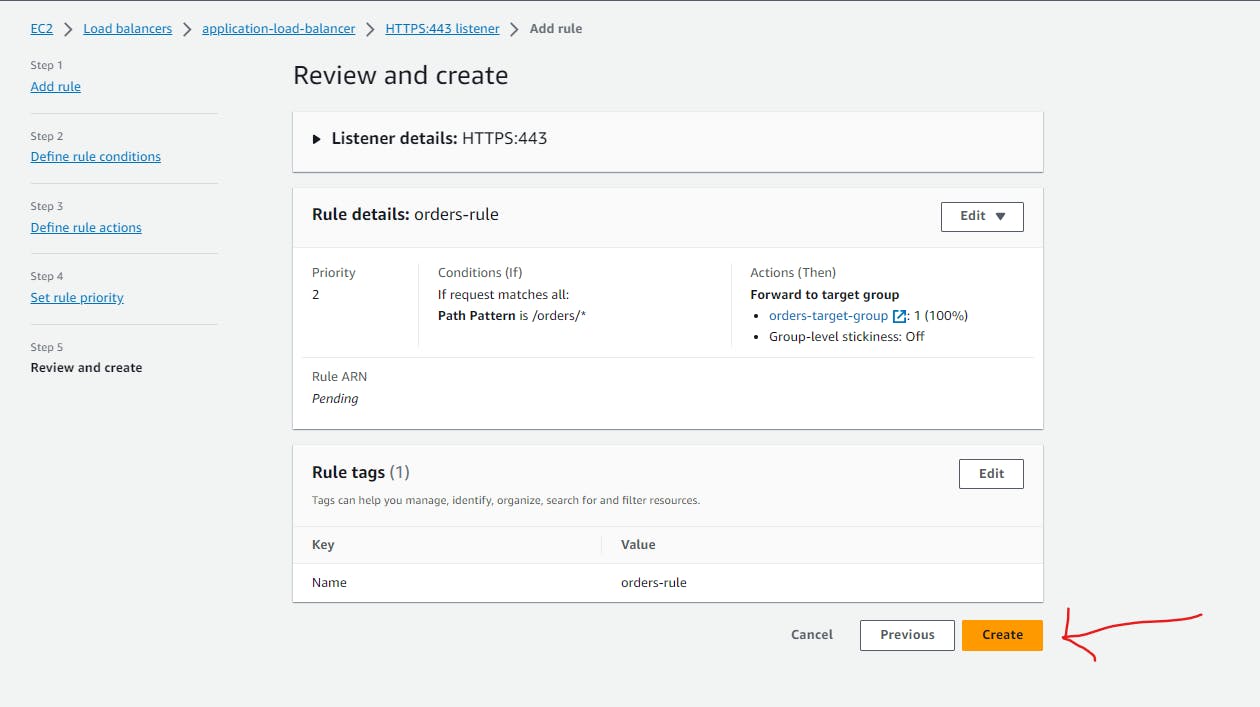
Update Listener Rules
Configure Rules:
Go back to the "Listeners" tab of your ALB to configure rules.
Configure rules to route traffic to the appropriate target group based on your application's needs.
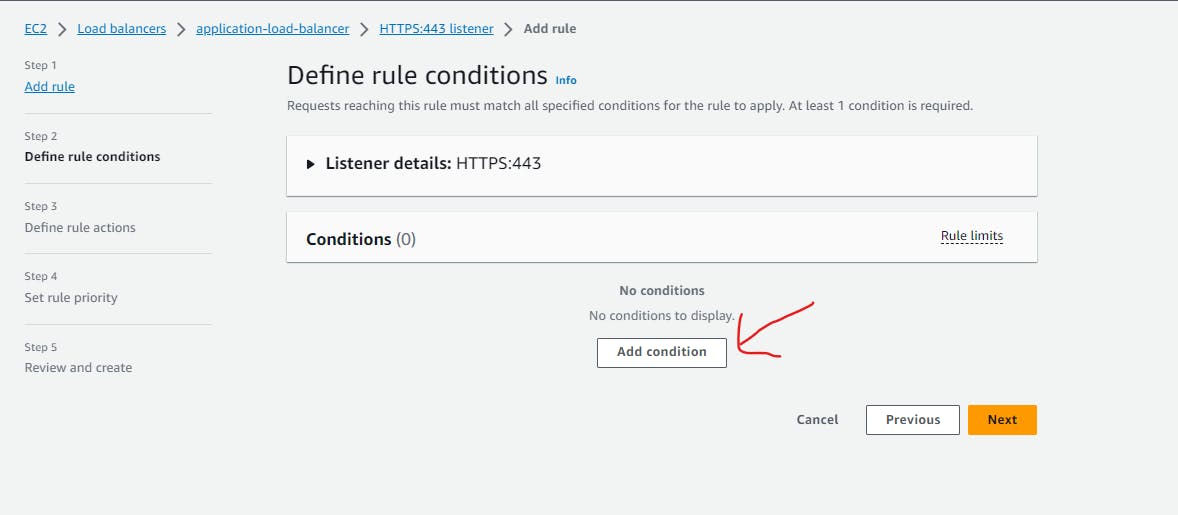
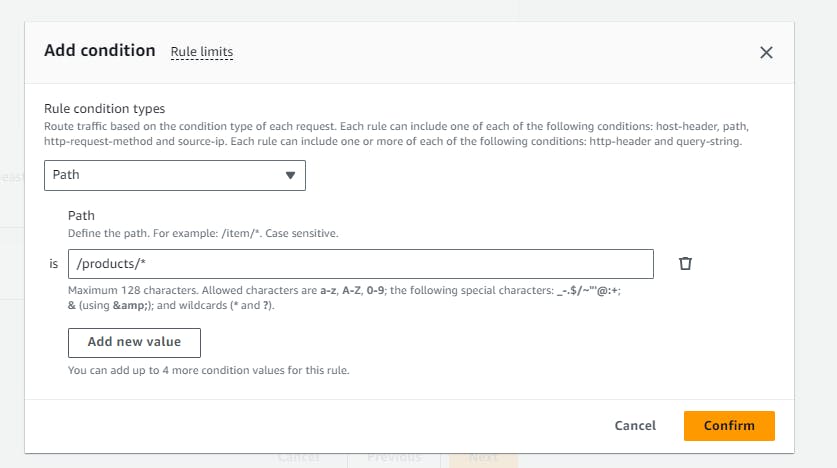
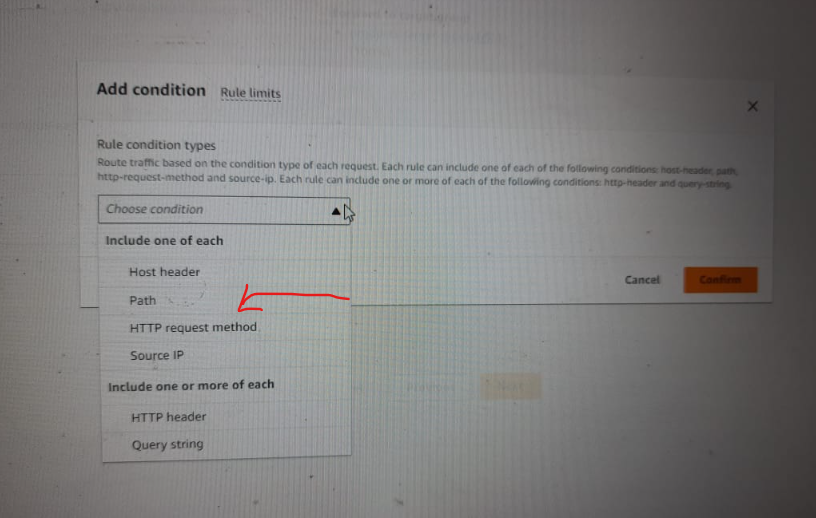
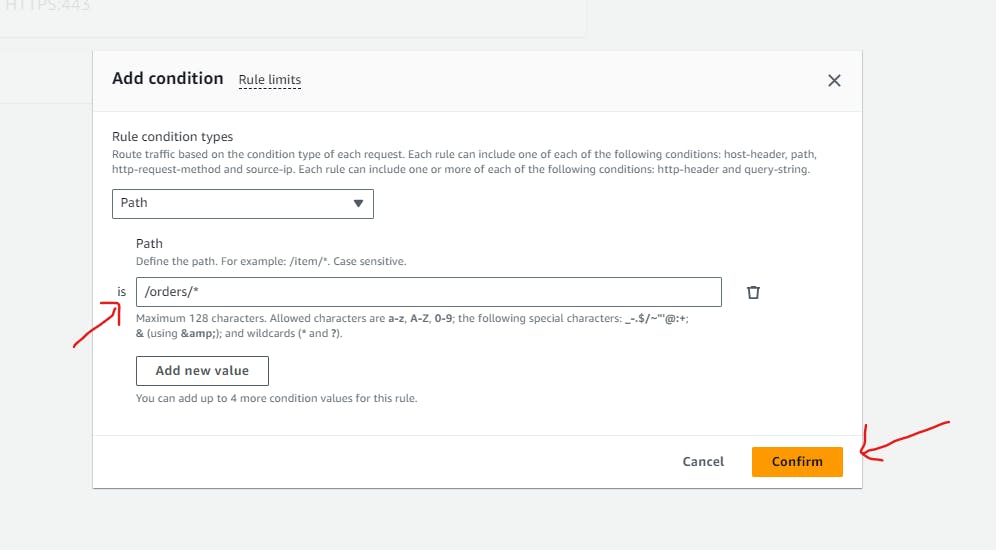
For example, you can use path-based routing to route
/products/*to theproducts-target-groupand/orders/*to theorders-target-group.If we add rule /products/* and /orders/* if have any pages after that also it will work

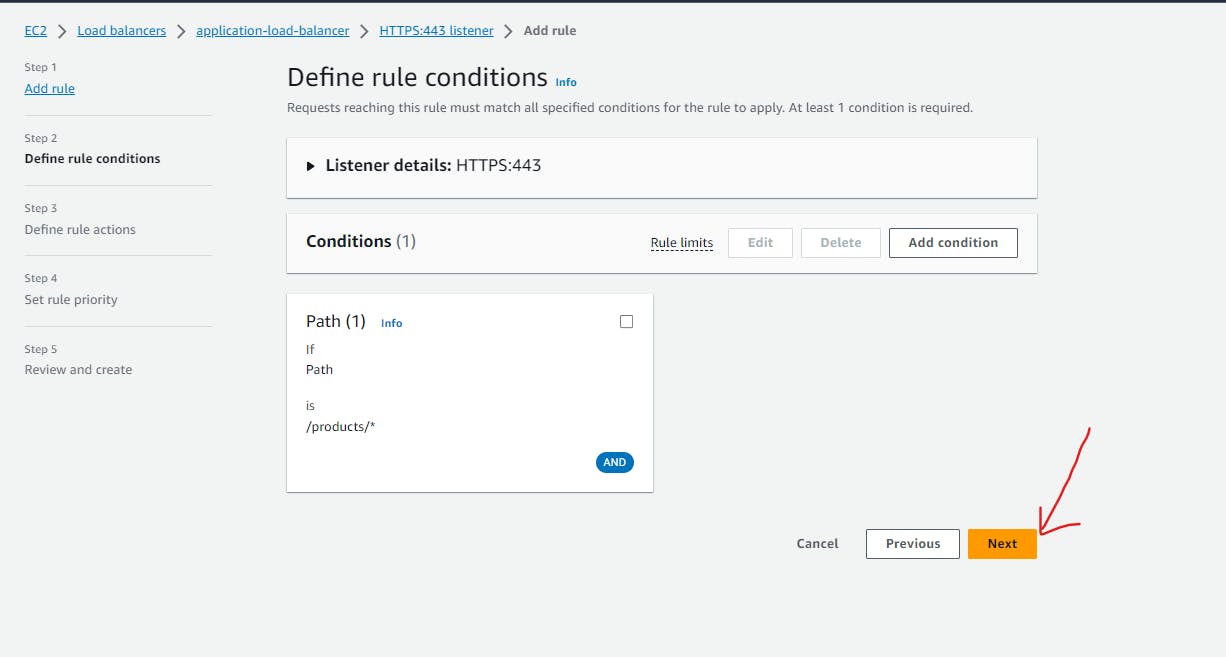
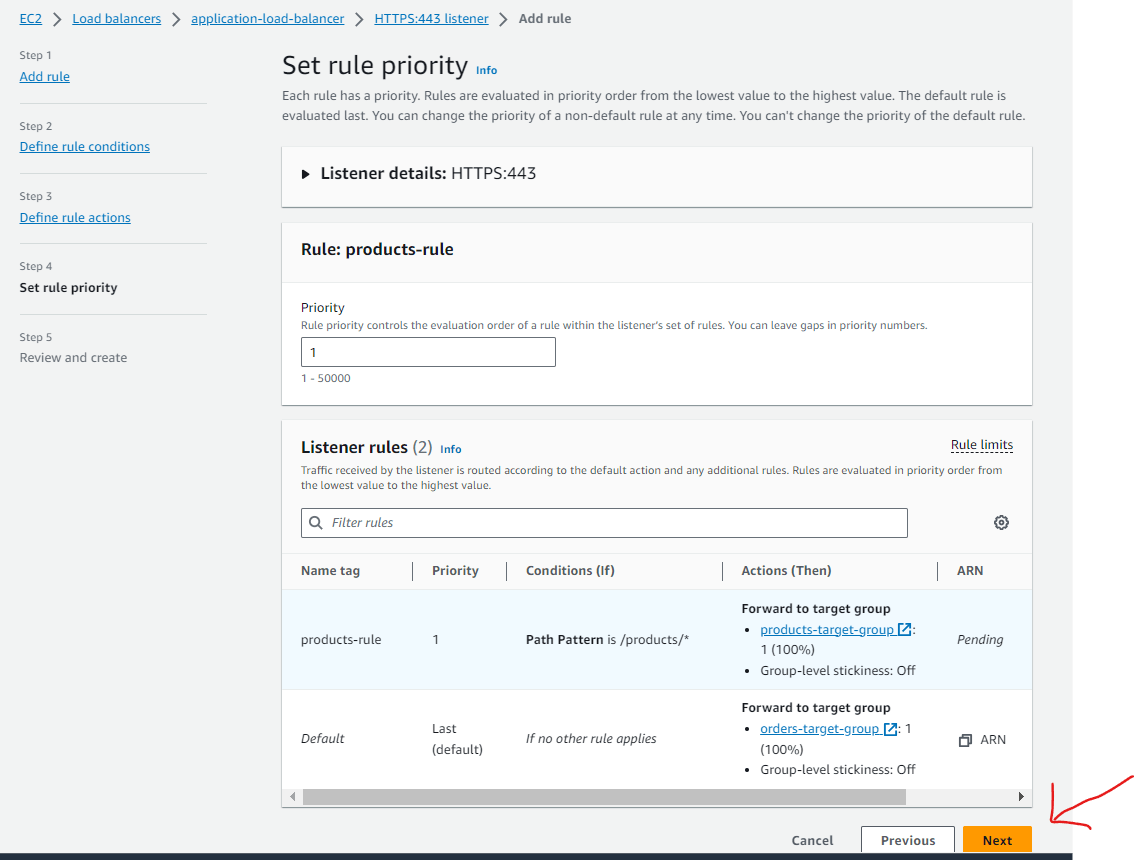
- Add the path-based routing to route to
/orders/*to theorders-target-groupsame as products-target-group. Follow the steps above to add a rule to the order's rule.

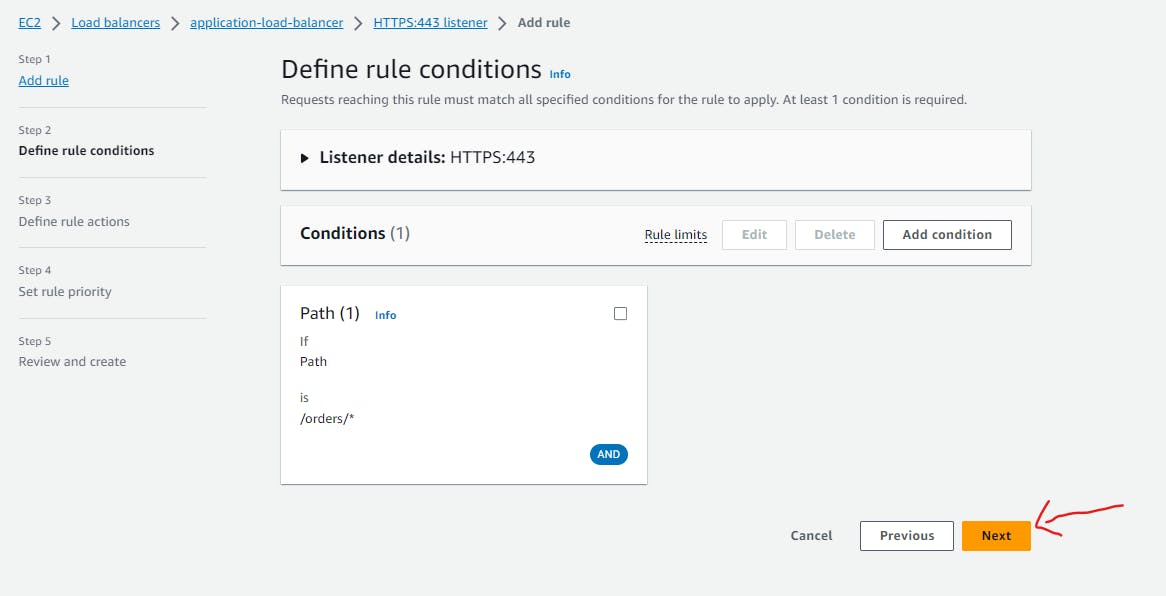
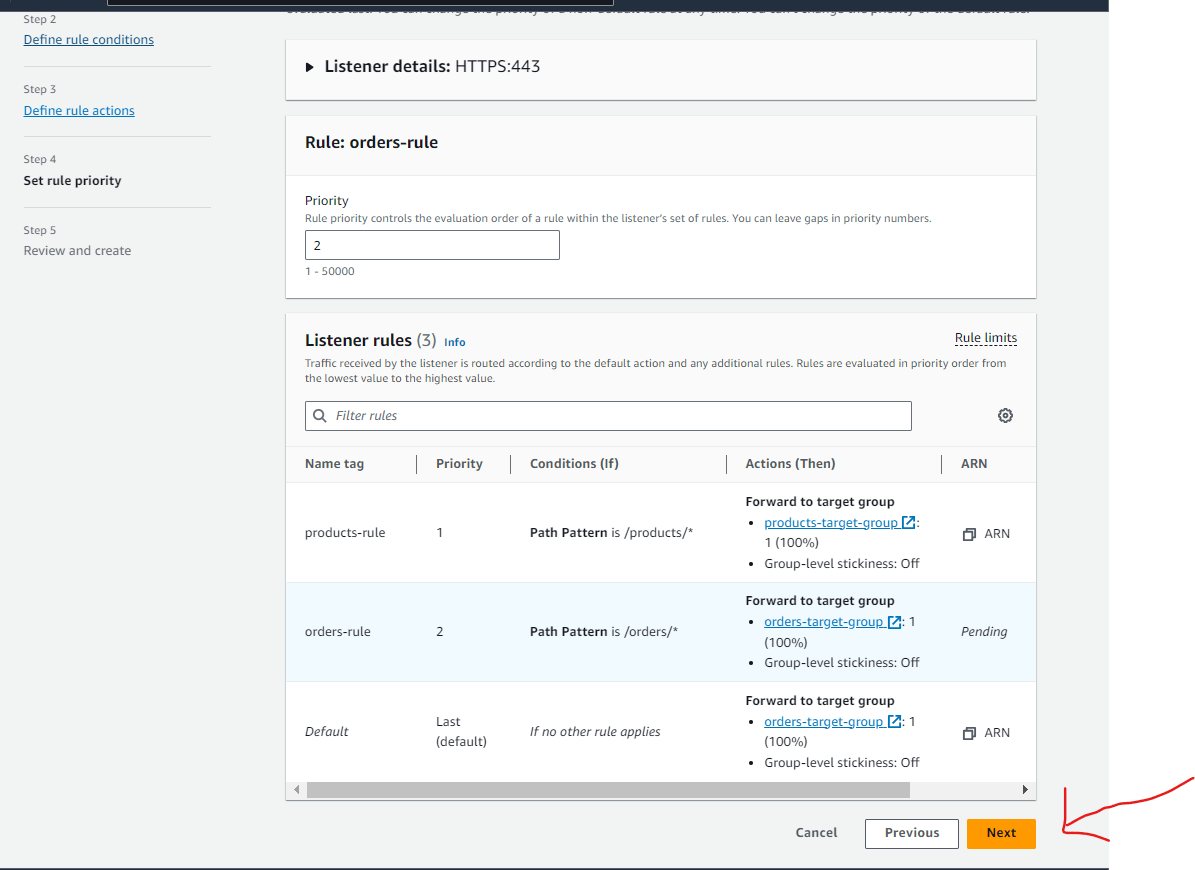
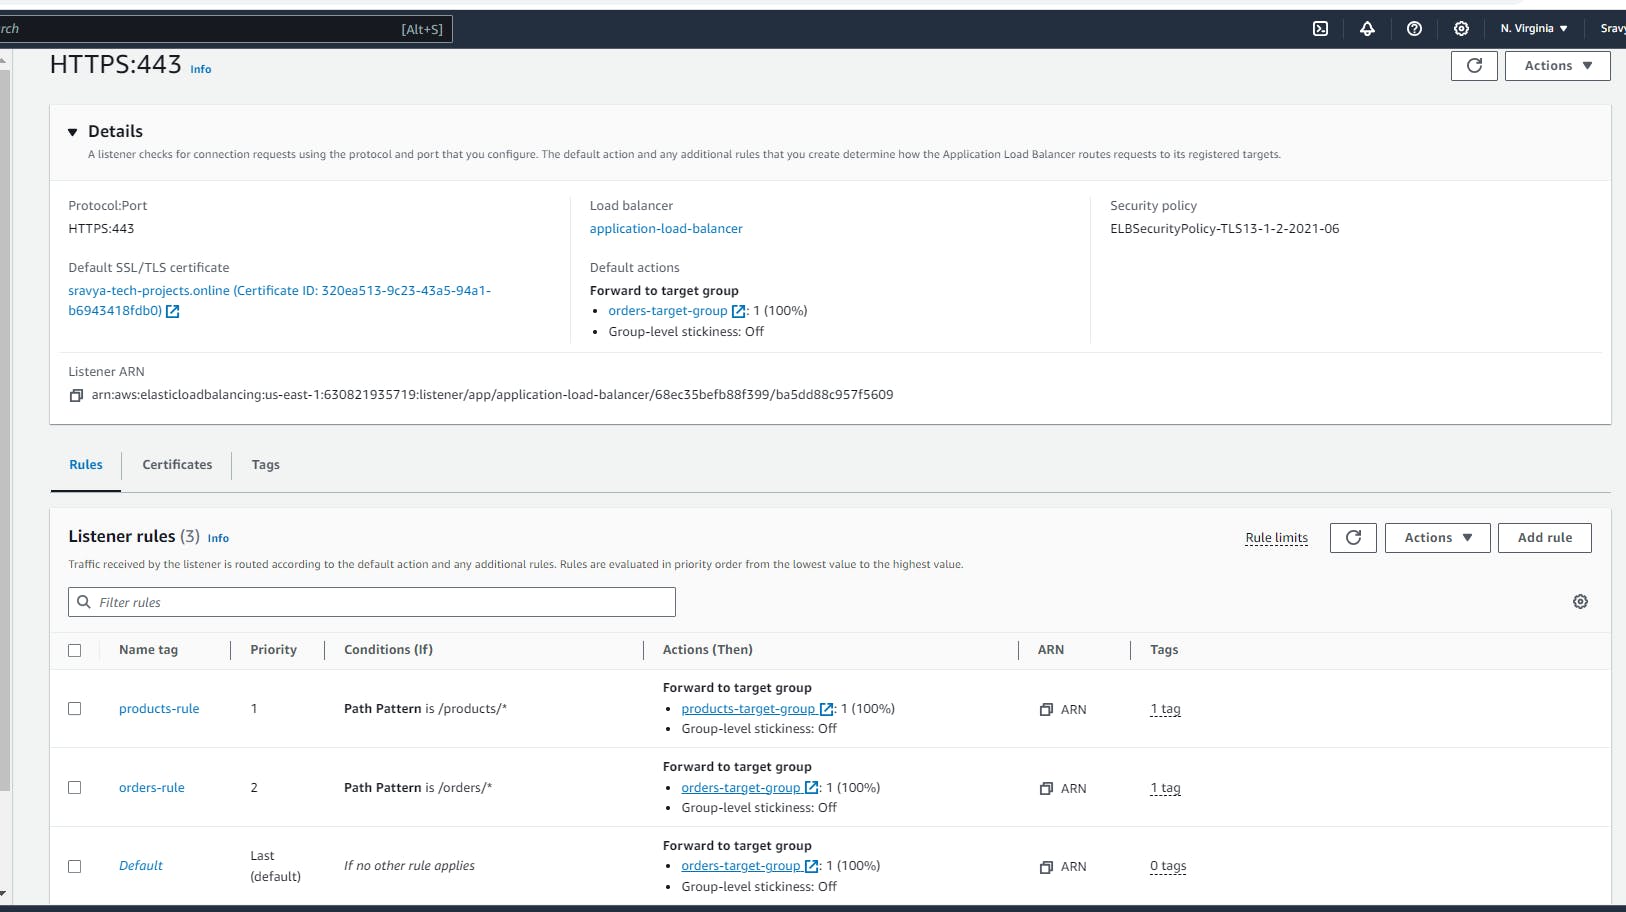
- With these steps, successfully set up an Application Load Balancer on AWS, created two target groups, and registered EC2 instances in each target group. ALB is now ready to distribute traffic to the associated EC2 instances based on your defined rules.
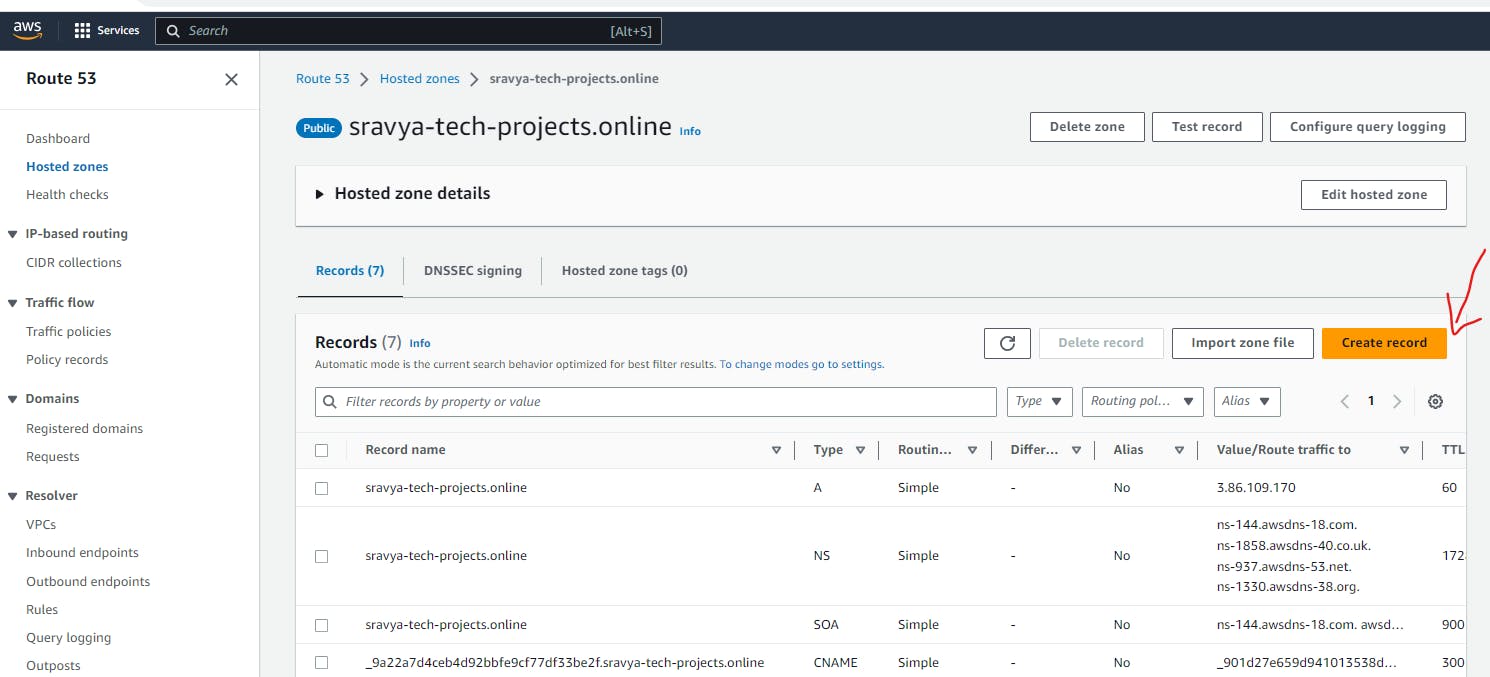
Add Load Balancer Record In Route53
In the AWS Management Console, navigate to the Amazon Route 53 service.
Inside your hosted zone, add a new record to set the Alias Target to the Load Balancer
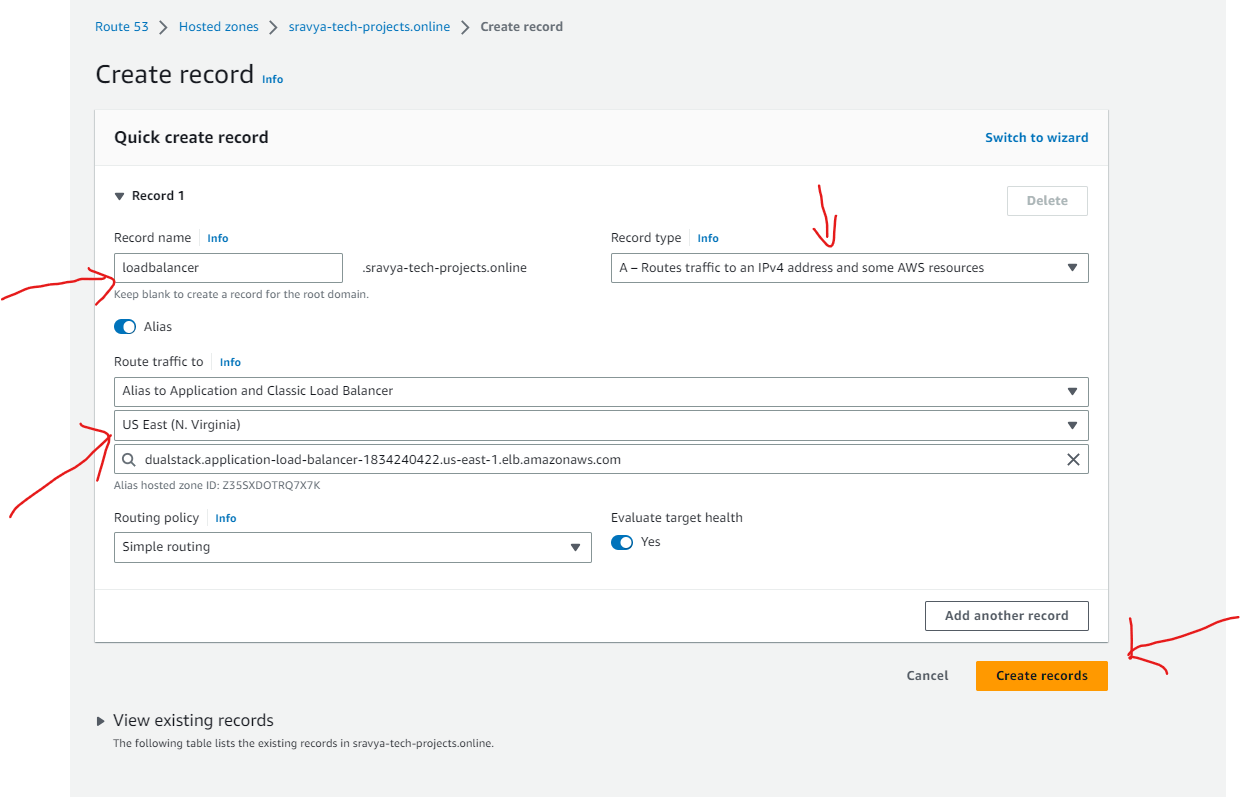
Give the record name as load balancer so we can access the application through loadbalancer.sravya-tech-tutorials.online.
Select Record type as A type Record.
Select Alias and select Route traffic to Application Load Balancer and give Specific Region and Application Load Balancer Name.
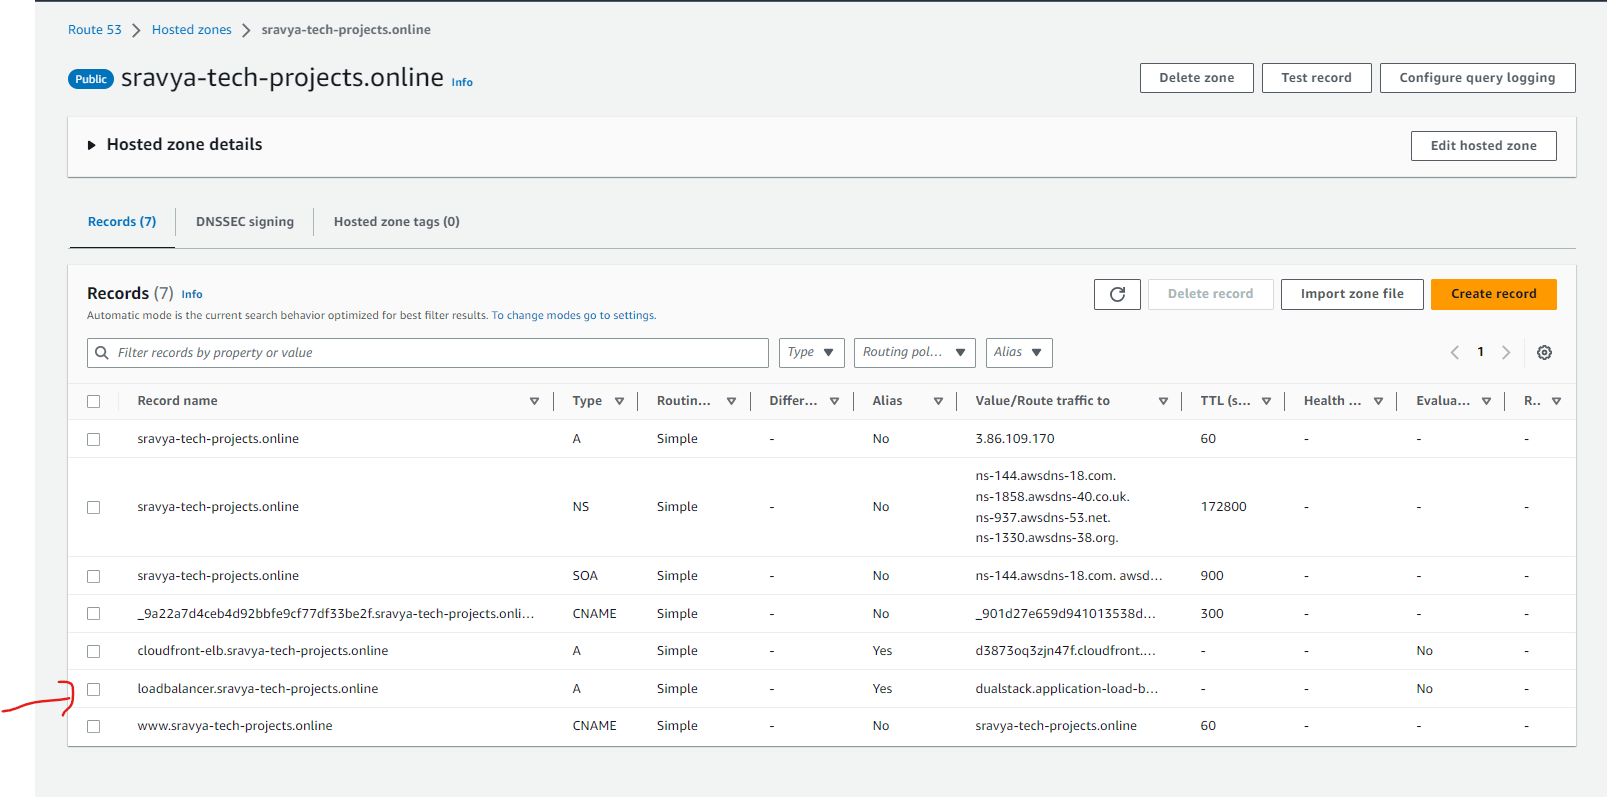
- Record added under Route53 hosted zone for Load Balancer
Access Your Application
You should be able to access your web application using your custom domain over HTTPS. Your application is now professionally hosted with a custom domain and secured with HTTPS, powered by Load Balancer, Amazon Route 53, and ACM.